Adventures in the Prep Lab

By Maureen Bickley, Museum Prep Lab Manager
Last updated January 14, 2021
Editor’s note: Welcome to the Adventures in the Prep Lab blog! Maureen Bickley has been our Museum Prep Lab Manager since 2015, and volunteer preparator since 2008. She has been spending time in the lab curating and prepping the fossil specimens and training volunteer preparators. We will update this blog regularly to share new specimens, new discoveries, and new adventures in the prep lab. Check back again soon to find out what she’s been up to! Please note that posts are shared in chronological order, so the most recent posts appear towards the bottom of this page. Click the button below to access the most recent post.
August 8, 2020
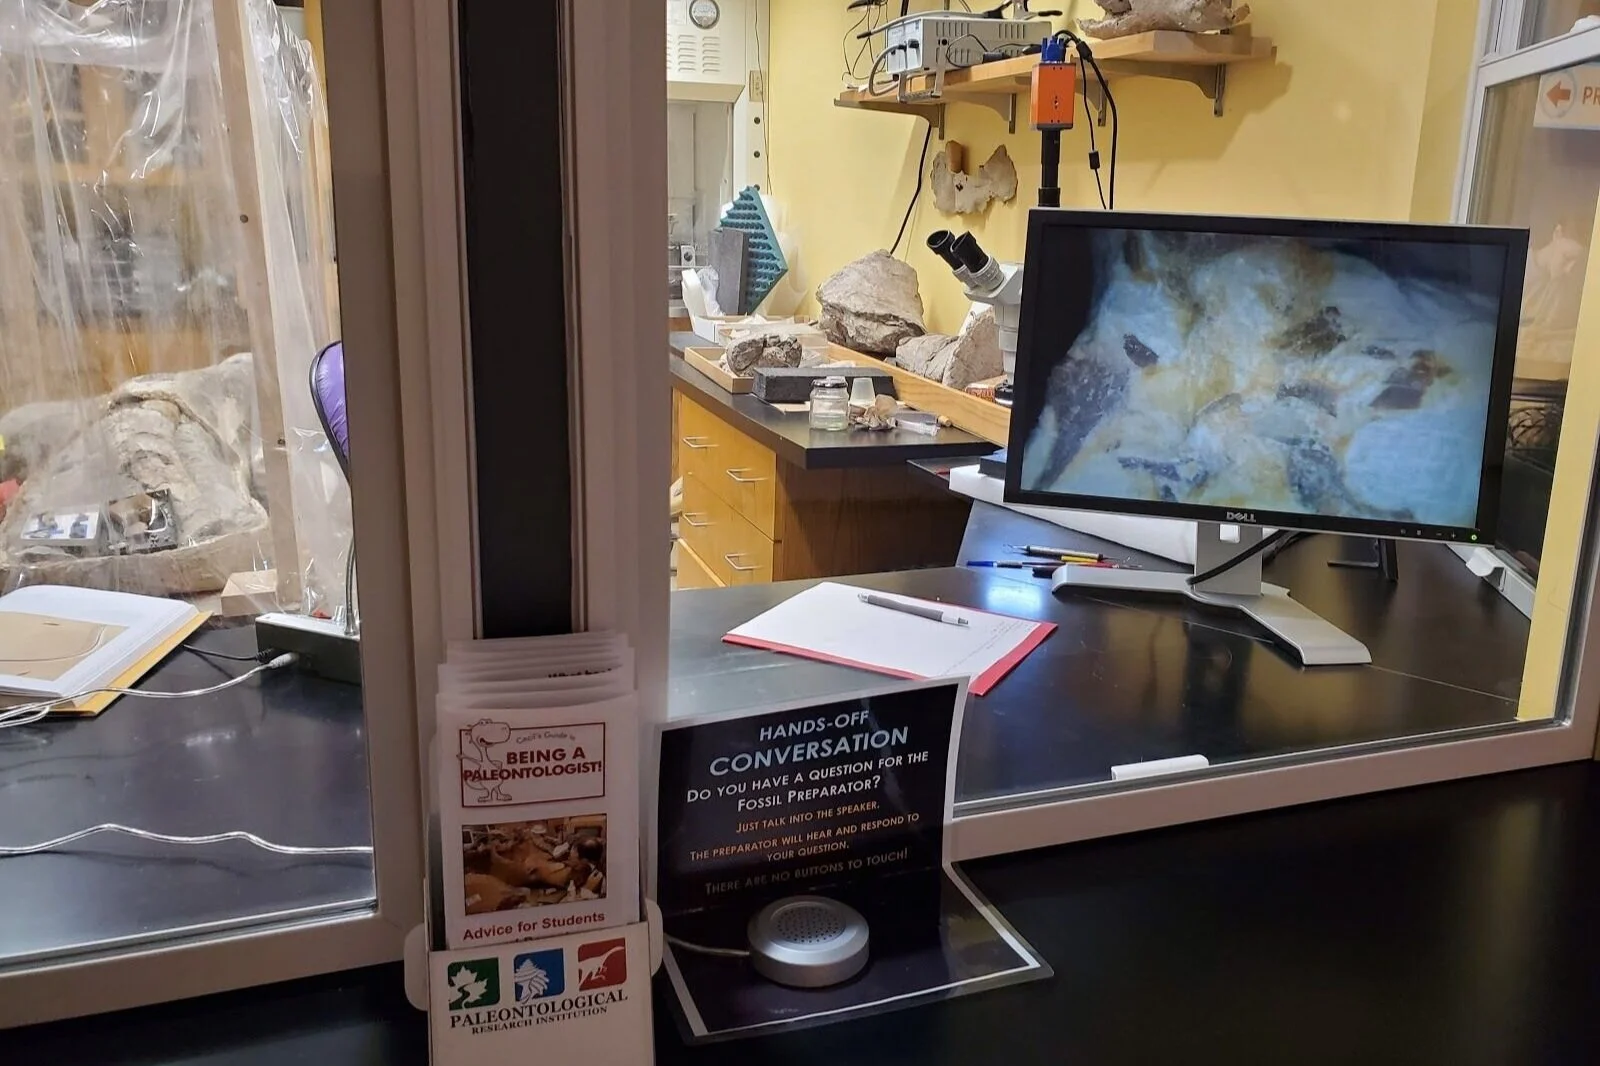
The Museum Prep Lab held on to its secrets while the Museum was closed during the pandemic. What is the Prep Lab? We are a public fossil lab in the Museum of the Earth that visitors can watch as trained preparators “work” on fossils. We have upgraded it while we were closed to allow for communication to whoever is inside working, as well as visualization of the prep being done under the lab’s microscope. I am the Fossil Prep Lab Manager, among other jobs at the Museum, and have my fingers, literally, on most of the specimens. I hope to get everyone up to speed on what we have inside the lab. Maybe show some prepping, share some of the interesting stories about the fossils we have in the lab, and find out how we distinguish between fossil bone and rock. I hope to be in the lab every day that we are open, so come by and talk.

Left: Picture inside the Museum Prep Lab. The contraption you see close to you is the specimen box and on top of it sits our air abrasion unit. The curly wires you see hanging are our air supply hoses. We have three air hoses allowing for three preparators working in the lab. But Covid rules have reduced that to one.

Close up of my current fossil & tools being worked on under microscope. My current fossil is a rare lizard from Southwest Wyoming. Fossilized in a layer of rock called the Green River Formation, though it was from an ancient lake 40-50 million years ago during the Eocene.
August 9, 2020
View of the prep lab from the outside.
Today I get to spend more time on the microscope. Yeah! It is my favorite type of prepping. The specimen I am working on is from Fossil Lake in southwestern Wyoming. This area has some of the most amazing fossils to be found. They call these fossils exceptionally preserved. While there is a wonderful National Monument called Fossil Butte National Monument where you can go see fossils and experience the quarry, there is no fossil digging. There are many private quarries in the area that allow you to dig or excavate for fossils. This specimen came from one of these private quarries. The fossil was found by cracking a block of rock in half and finding the fossil hidden within. It is one of three lizard species found in this layer of rock. It has been identified as a Saniwa ensidens. The cool and exciting thing is that we feel it is a juvenile, all the other fossils of this species have been adults, which grow to about 4.5 ft in length. This one is only a partial skeleton but it seems to be only about 12 inches at the longest.
There is so much to tell you so I won’t fill your mind up quickly, there is plenty of time for that. You will have to come back to see this fossil and the lab progress. I thought I would show you another photo of my lab the way our visitors see it. You can see a screen with some pieces of bone. That is the specimen I am working with on the screen. I can show the visitors my work up close and point out structures or they can watch me work.
My work process usually starts with lots of pictures of my specimen and plans. I spend at least the last hour of my work each day writing and taking more pictures. Oh and cleaning up my work area - this can be very messy work. In the “old” days, before I updated my phone at least, I would take a picture, print it off, and draw a grid on it. That way I could make plans of how to approach each area and to refer to the grid on the picture if I have to remove a piece. I won’t be removing pieces with this specimen. It is a compression fossil and the whole animal has been compressed to a couple grains of sand thickness. So I will just expose the bones to better view it. I took the picture of the fossil, and then with my phone, I was able to make a grid on it. I am always amazed with technology. Now I just need to refer to it while I work on the fossil.
I have included the grid photo and I also have a photo that I took of the entire fossil nine days later. You can see some new bones, especially a few ribs that had been hiding.

Grid photograph of the lizard fossil.
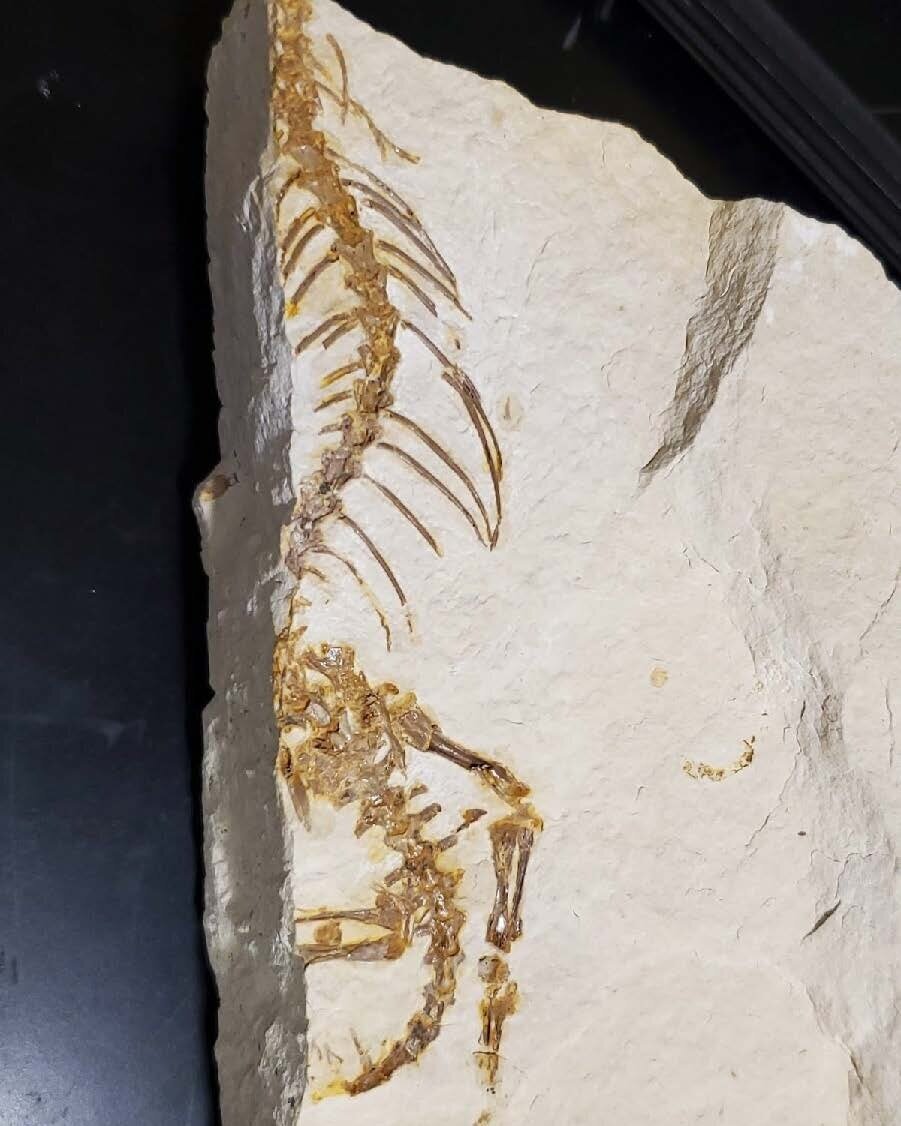
The fossil nine days later after additional prep work.

Knee area of the fossil lizard specimen.
I completed sections A, C, and I am currently working on E. Once I finished, I have been consolidating the bones with a kind of very thin glue we make in our lab. I do not always do this, but this fossil is extremely fragile. I also have a photo of a close up of the area I worked on today. It is one of the upper leg/knee area. To give you a sense of scale, the hash marks on the ruler are 1/16 inch.
Additionally, I have determined that I am working from the bottom of the animal. I will explain that more in another post. As I finish Section E, I will be done with this portion of the fossil. The next post will share some identifying structures on the skeleton.
August 10, 2020
The end of this weekend means the end of a project, but planning for the next. The lizard skeleton that came in partially exposed is completely exposed and preserved. I would include the final photo I took, to establish the way the completed fossil appears, but it looks very similar to yesterday’s photo (refer to photos in 8/9/2020 post). Next I will begin the other large block (block of rock from the same area) and work down to the unknown fossil in the middle. That will be my next weekend project.
Many of my projects are worked under a microscope and deal with tiny bones or shells. But that is not all that we do in the lab or the only thing a preparator does. Here are a couple pictures of large dinosaur bones that we have on loan from the Carnegie Museum of Natural History. When I say large, one is around 6 ft long and the other will be about 3-4 feet once it is put together. One is a shoulder blade (or, scapula) of a long-necked sauropod and the other is a tibia, or bone below the knee of a Camarasaurus, also a long-necked sauropod dinosaur. Come by the Museum and get a closer look.
These dinosaur fossils have a unique story of their own. They were excavated from the Carnegie quarry, which became the Dinosaur National Monument in Utah. These fossils were removed from the quarry in the early 1900s, probably around 1910. They travelled by train in a crate to the Carnegie Museum in Pittsburgh, Pennsylvania. Upon arrival, they were stored in the Museum’s vertebrate collections until they were sent to our Museum’s Prep Lab for us to open. We were the first to see the contents in over 100 years! This is the result. Two very large fossils in the process of preparation.

Scapula of possible Apatosaurus sitting in its protectie plaster jacket. The inset image shows the scapula bone (in red) on a drawing from the book Marsh’s Dinosaurs. This bone is approximately 6 ft. long.

Close-up image of the large cracks we are dealing with as we open the jacket to expose the fossil. We will discuss that more in a later post.

This close up shows the line of bone and matrix (surrounding rock). It is very difficult to distinguish the two. Hint: the bone is on the left side, slightly darker.
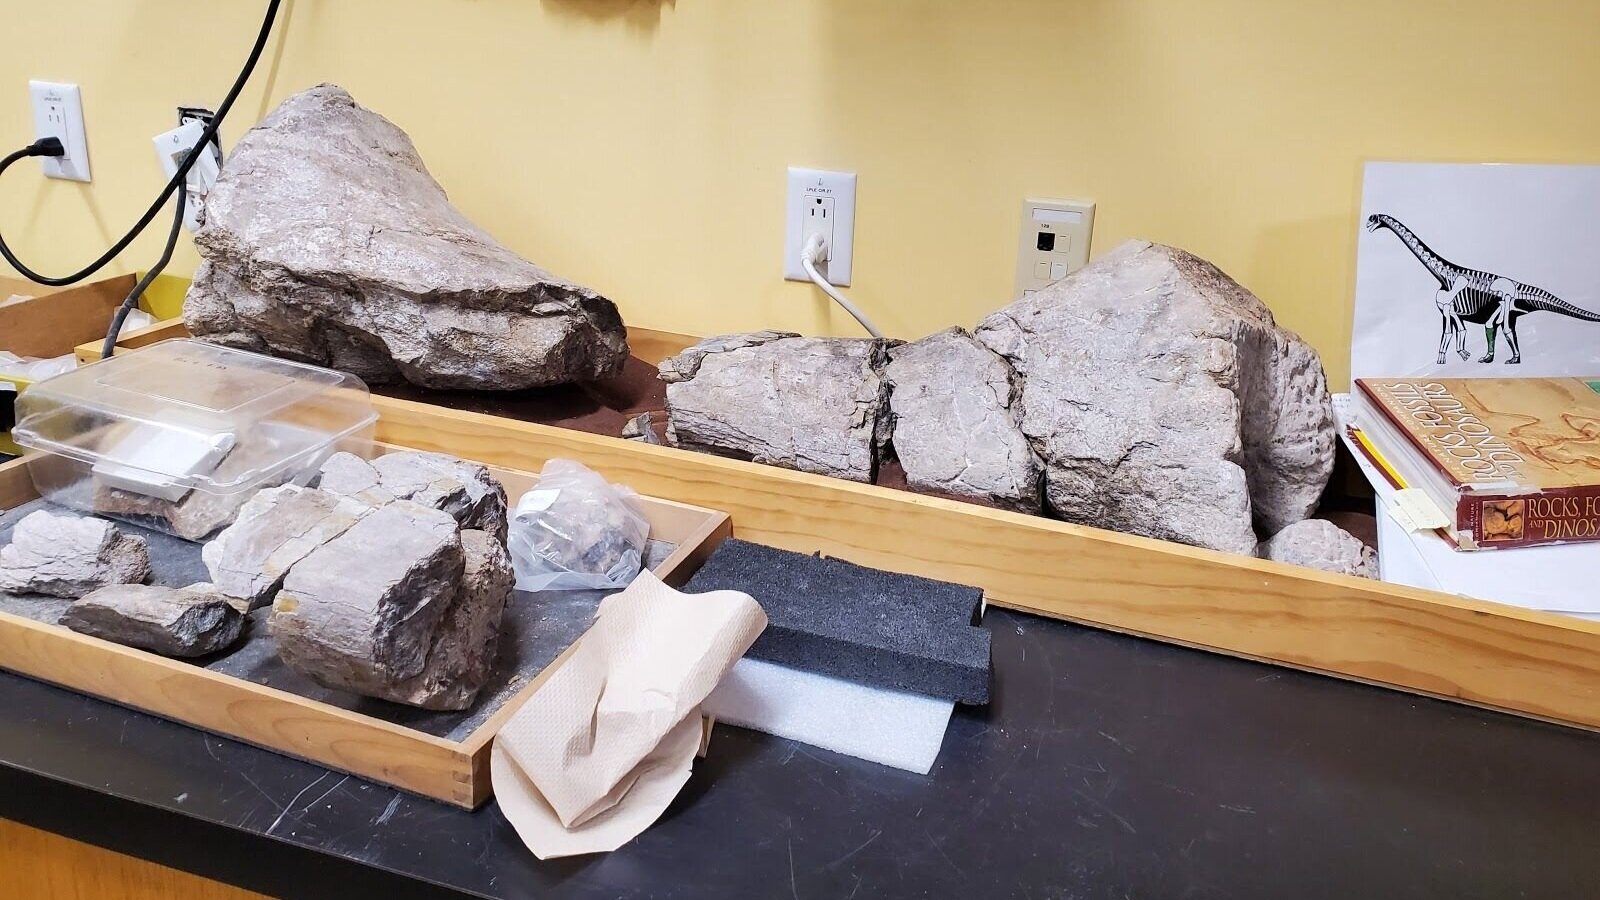
Dinosaur tibia in pieces sitting on a bed of sand, along with a drawing of Camarasaurus, the probable species of dinosaur that this bone belongs to.
August 15, 2020
Back in the lab talking to visitors today. I start the new piece today! It is another block of limestone from the same quarry as the last specimen. (Remember the Lizard skeleton I was working on?) My approach to this one will be completely different. I will use air scribes for this work, no microscope. I need to debulk, or take a bunch of rock off the top of the fossil. I will approach it from the “top” taking off the rock or matrix in layers. The top was decided because the other side has a fish fossil we have chosen to leave untouched. Once I get close to the skeleton, my progress will slow. This work requires using different tools. An air scribe is powered by compressed air and sends shock waves to the rock, like a mini jackhammer. That should remove the rock quickly. But I need to watch for hidden treasures as I move down through the layers in the block.
My photos are of the block at the beginning and after I removed two inches to complete my first day. I also included a pic of the mess I made. It took quite a long time to clean up.

Side view of the block at the start of my work.

Removed two inches by the end of the day. I am working down to the brown horizontal lines about midway. I also put arrows on the block to warn me there may be something to look for in that layer.

Made a big mess to clean up. Windows are for Museum visitors to peak into the lab.
Having the prep lab on view to visitors makes me think about visitor experience when I work on my specimens. I think about how to present my work and make the approach interesting to people visiting the Museum. It is an added degree of difficulty when planning out my specimen prep. Today I wanted to have visitors see the approach so I set up right at the front. Unfortunately my work chipping off the rock made a real mess. I even had a dust collector hose set up to help with the dust, but it did not work well. I will be cleaning up for days. I had hoped that people would stop by to talk as they saw chips of rock flying all over. Not sure I made as much of an impression as I made a mess.
I found a few fossils that I extracted out of the matrix to keep. After examining them under a microscope, however, they were less than interesting: A few fish scales and petrified poop called coprolite. With all the mess I think I will work in the specimen box tomorrow. This approach is out of the view of visitors so I will stop frequently and talk with them about the lab. These air powered tools are loud and transmit vibrations through one’s hands. Breaking up your work time is a must. There are two more inches to go to the fossil, so once I get down to the skeleton I can bring it back to the windows. I hope this fossil will be the rest of the skeleton of the lizard. So check back tomorrow to see what we find.
August 17, 2020
I did it! I made it to the skeleton. And, drum roll please, it is the lizard from the other block!

Portion of the lizard skeleton from the second block.
I only had a half of an inch to go down into the block to reach the fossil. It was very scary. I found the tail vertebrae first. What is there is a rather short tail, so next week I may debulk the rest of the block to look for more tail. There are two more pictures. One is of the skeleton aligned perfectly with the other block.
The two blocks together, connecting both sides of the fossil lizard skeleton.
The other image is a whole view of the two blocks. Do you notice something? Yes the skull is missing. Sad. We do not have the other block that holds the skull. They had looked in the quarry after the collector had left, but did not find it. Who knows, it might still be there somewhere to discover!

Note that the head of the fossil lizard skeleton is not preserved.
My approach again was slow. As I got closer to the fossil, I kept changing my tools to finer and finer tips. When I was only a few grains of sand above and I had a good idea of where the whole skeleton was, I moved over to hand work under the microscope. You just have to go slow with that technique.
This was a successful weekend working on this part of the specimen. But more to come next week. I will debulk the entire block to the skeleton to look for stray bones, then it will be time for its owner to come pick it up. What after that? Keep watching to find out what we do and learn next.
August 24, 2020
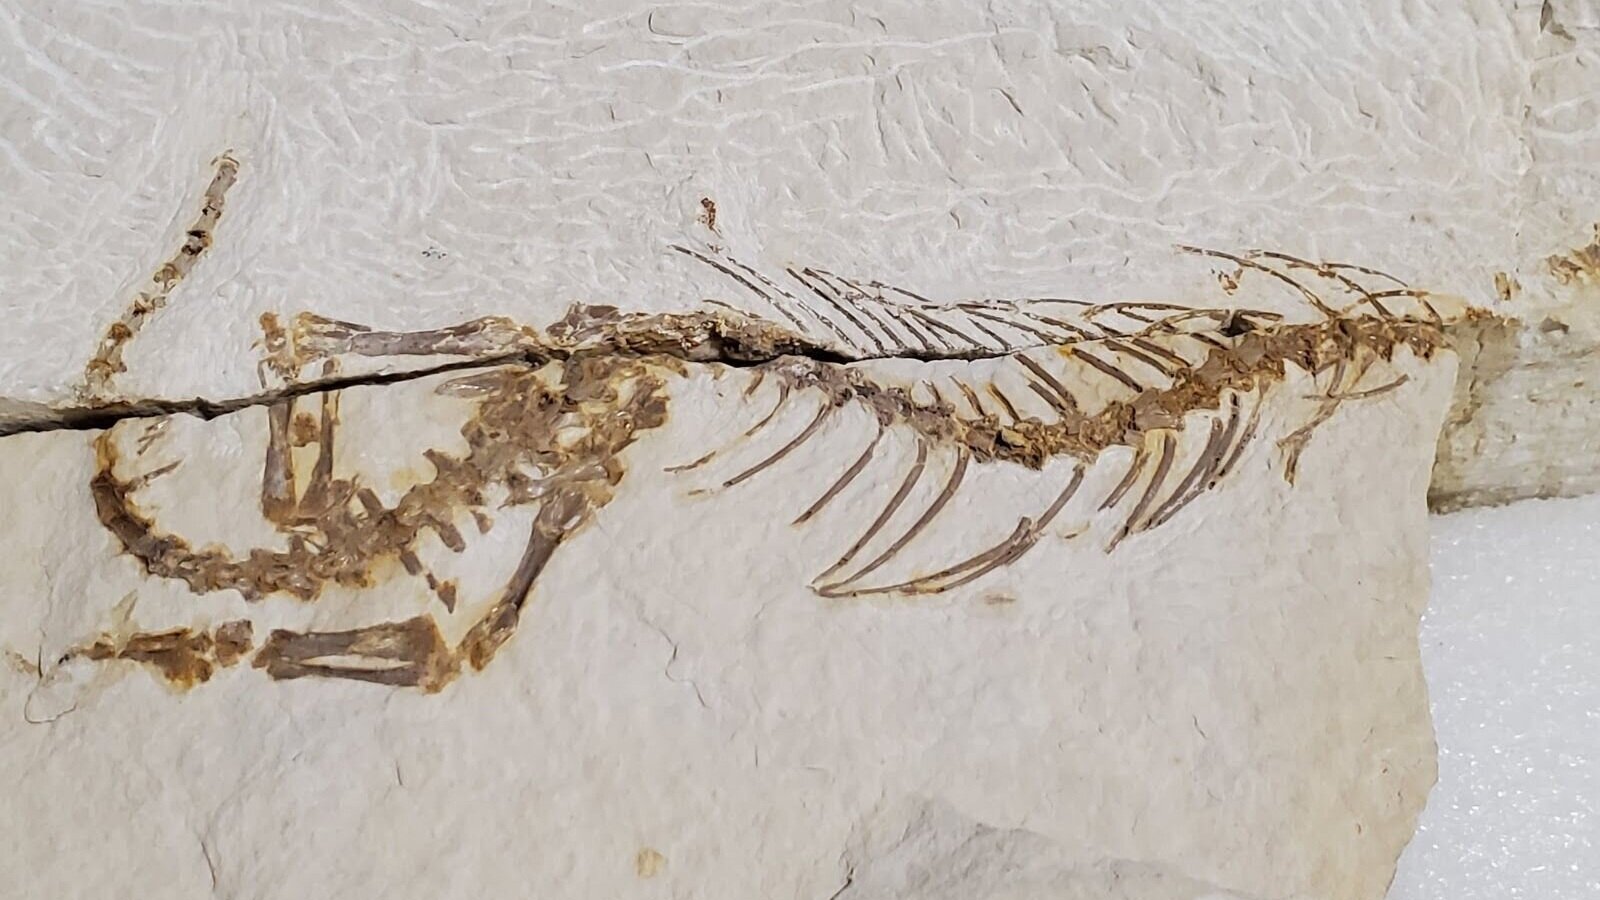
Prep Lab specimens galore! After making it my main focus this weekend, I completely uncovered the lizard skeleton that was hiding in the block of limestone. I found about eight inches of tail, but assume that it continues out the block since the adult specimens all had very long tails, kind of like iguanas. But, because it is missing, we will never know.
I included a photo of the completed specimen with all the block pieces together like a puzzle. I also drew a picture of the lizard over the skeleton so you could see how it looked. Could have done a better job on the drawing but you get the idea.

The fossil lizard skeleton with the tail exposed.

Outline showing the shape of the lizard.
While in the lab last weekend, I also cleaned up and readied the dinosaur tibia specimen (see the August 10, 2020 post) because the volunteer who worked on it will be returning this coming weekend. I hoped to step away one day each weekend and let others who work in the lab showcase their specimens. Mike D is working on the dinosaur bone shown below.

All pieces in clear boxes.

Tibia pieces in garnet sand.
The tibia is in many pieces, big and small. It arrived in the scapula’s crate, but it was in multiple smaller jackets. (A jacket is plaster wrapped around a fossil and placed on it at a field site for protection during travel and storage.) We did not even know this fossil was in the crate. It was a discovery for the lab when another preparator, whose name is also Mike (Mike M), opened each jacket carefully and realized the bones all seemed to go together.
Mike M is the primary preparator on these specimens. The Carnegie paleontologist Matt Lamanna asked for Mike M to prep these two dinosaur bones. He is the lab’s top preparator and has been working on Carnegie dinosaur loans for many years. The Museum of the Earth has a relationship with the Carnegie Museum of Natural History. We have gotten crates of dinosaur bones to prep for many years. Always for two years and an option to renew. It turned out that even the Carnegie staff did not know what the smaller jackets contained. But one of the jackets contained more than a hundred smaller pieces. Once we had all the larger bones out of their jackets and cleaned off, the tibia was ready to put back together!
Preparation is performed in many ways. One technique is removing the matrix (the sedimentary rock that surrounds the fossil) from the fossil in order to expose the fossil for display or research. That can be accomplished in many ways. Preparators use air driven tools such as air abrasives or air scribes, hand tools such as pin vises, dental picks, brushes, or chemicals such as acids. Then there are other techniques such as puzzling together over 100 pieces of a 3.5 ft long, 150 million-year-old fossil bone. Not every preparator likes to do all the techniques. It turns out that Mike M, who had been assigned the specimens and worked on all the jackets and pieces, was not one for puzzling or reconstruction. Mike M has amazing hand-eye coordination and practiced skill and patience. That is why the Carnegie paleontologist asked for Mike M to work on these fossils. But when Mike M opened the jackets and was finished exposing the fossils he said, “Okay we can send this back to the Carnegie Museum’s collection.” I said, “No way -- we’re putting it back together!” Mike M replied, “not me.” I love puzzles and would have loved to do it myself but I have other duties that did not allow for me to work on this specimen. So I needed to assign someone who could dedicate his time to this tibia specimen. I found another one of my preparators, Mike D (Sorry I have two Mikes working on the dinosaur specimens!), who was thrilled to work on a dinosaur fossil and spend his time puzzling. It turns out Mike D enjoys the many hours staring at small pieces of rock, that all look the same, to find that one match. The Mikes and I are all huge dinosaur fans. So Mike D, who also has a lot of prep experience, had started working on the tibia (#DNM165b) in fall 2019, but then the Museum closed and he was unable to work on it. He has been very excited about coming back!
August 29, 2020
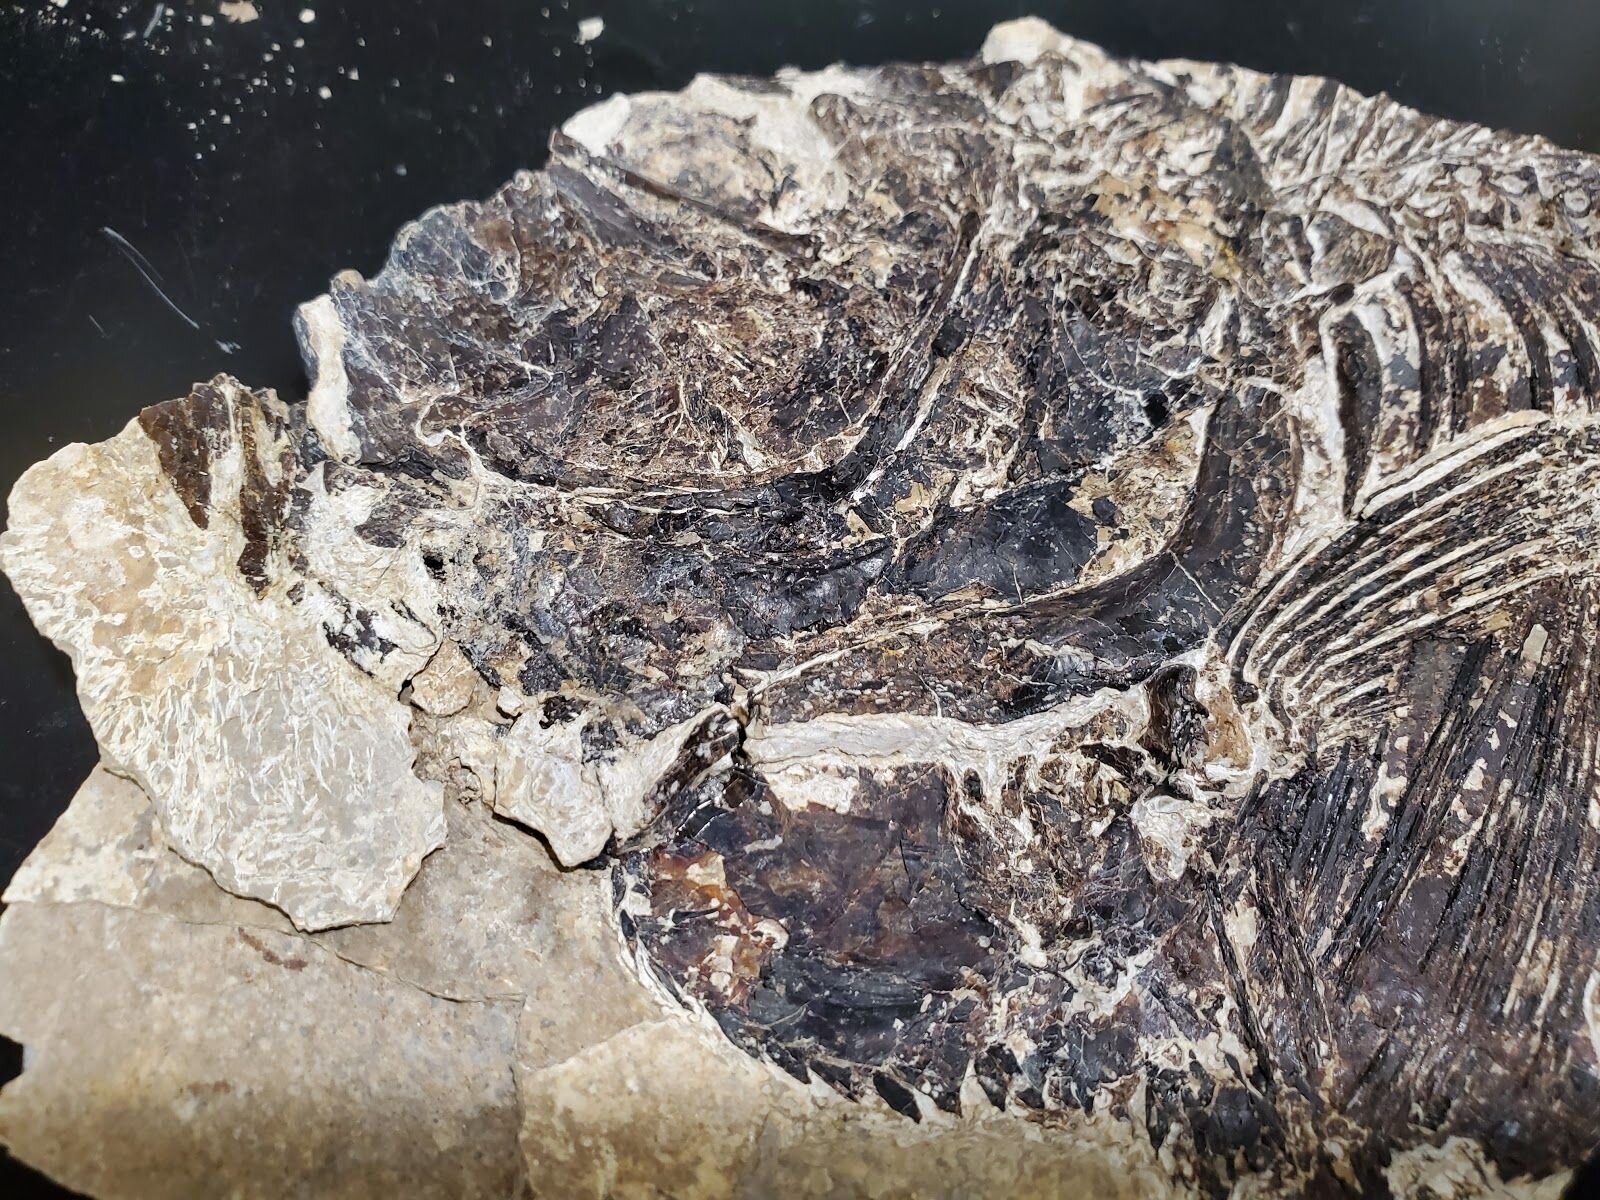
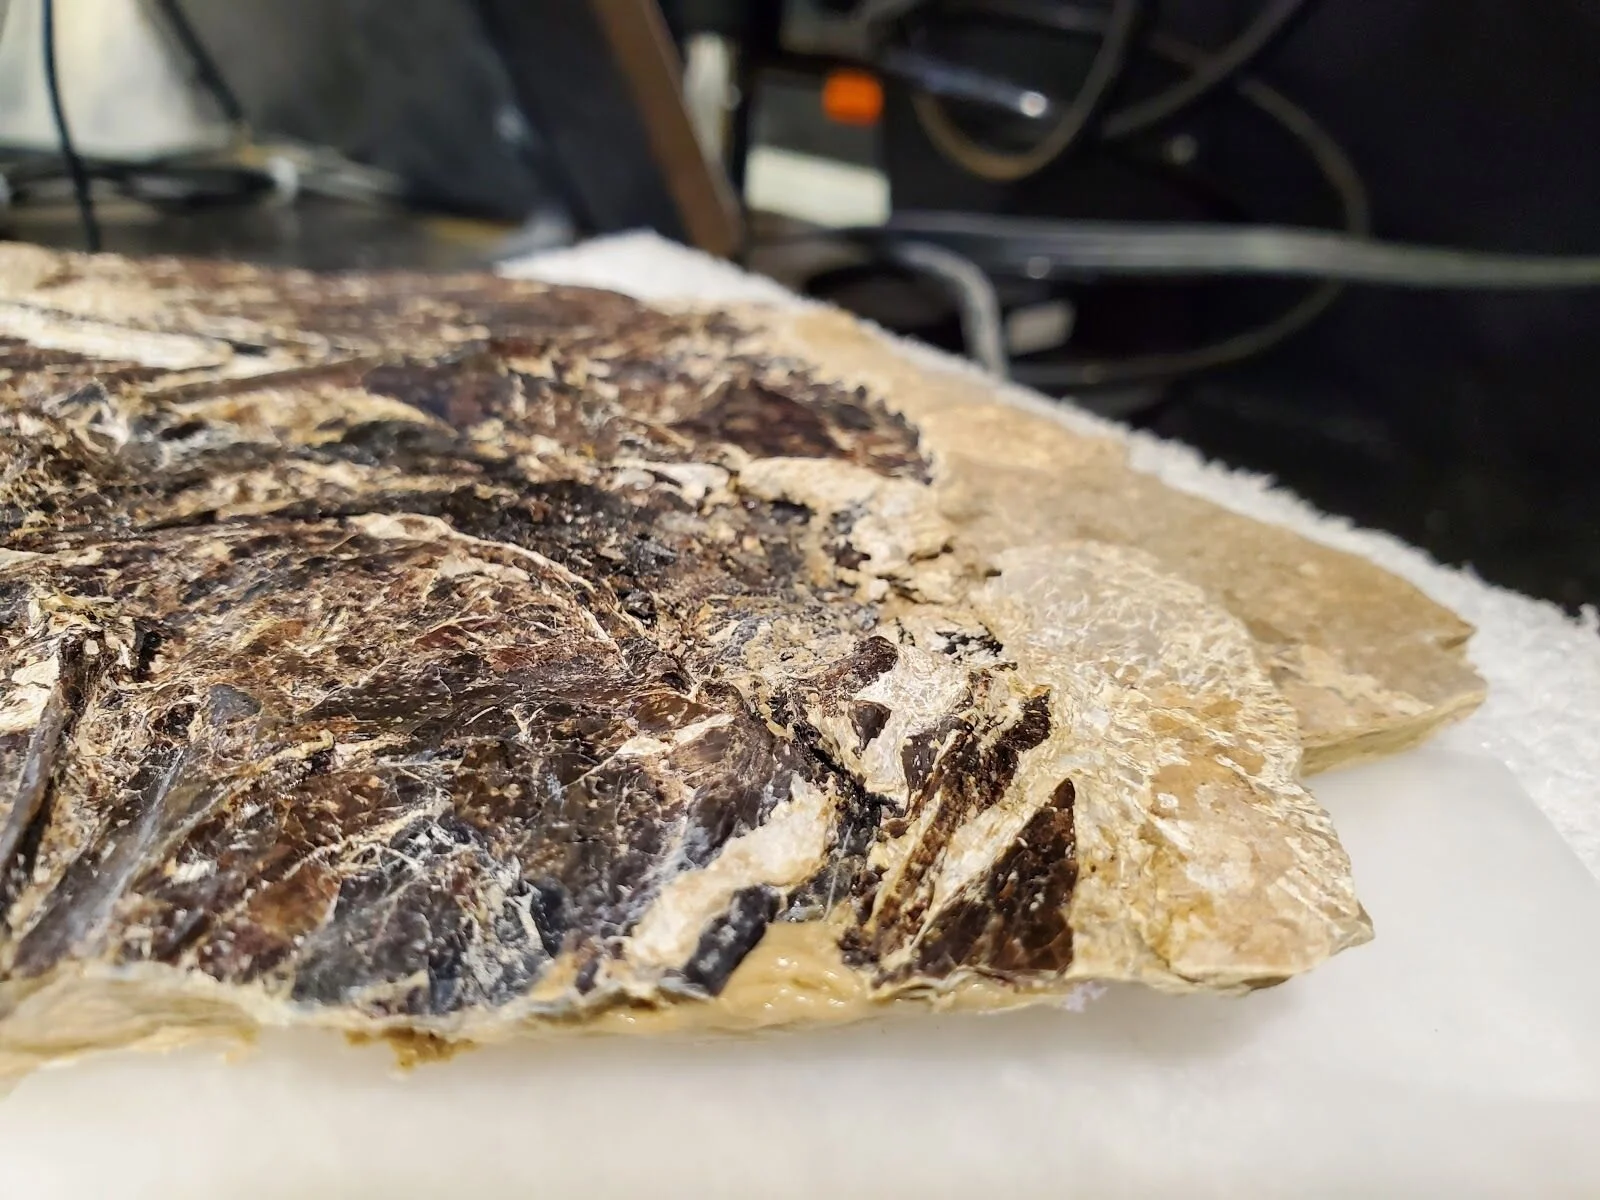
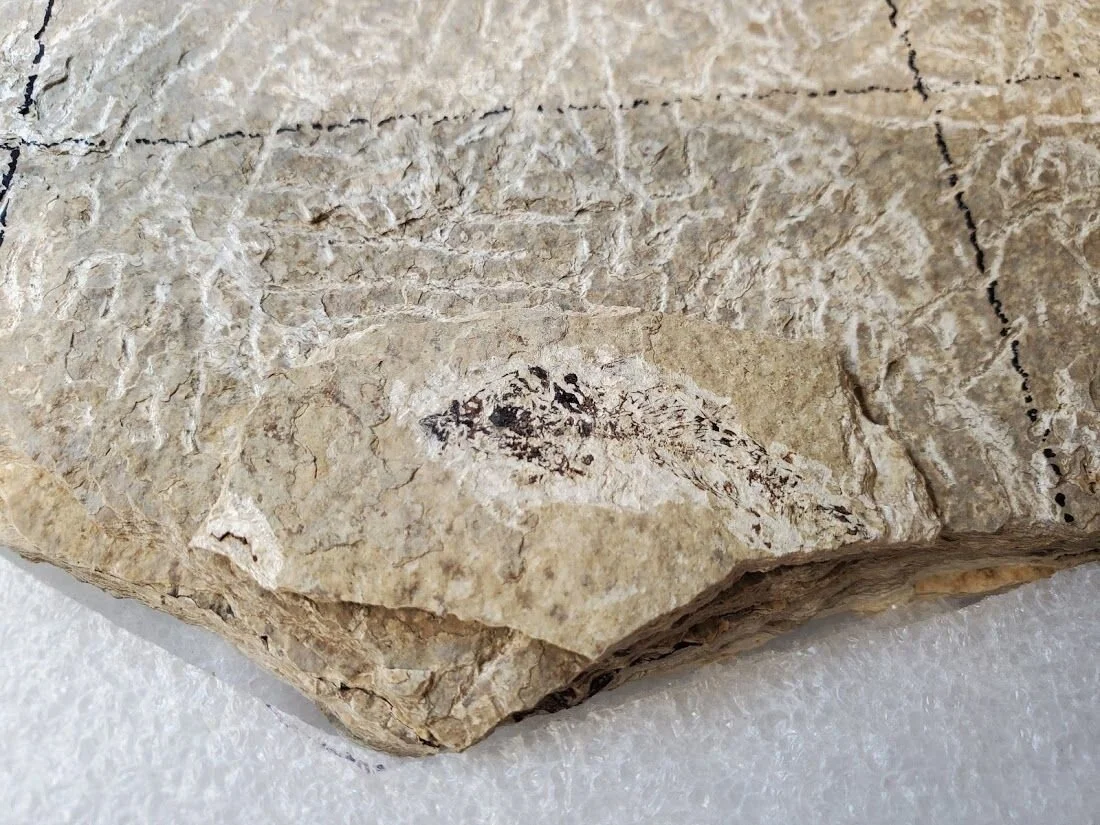
My new project comes from a staff member at PRI. She had started prepping the fossi,l but has not been able to find the time to complete it. I am glad to help! This fossil is also from the area that my lizard fossil was from (see earlier post), or at least the formation is the same. A formation is a layer of rock in the Earth that has consistent characteristics (type of rock, age, and fossils). We call this particular unit in southwestern Wyoming the Green River Formation. This is a formation with exceptionally preserved fossils, as shown by the amazing lizard fossil I was working on and my new fossil, which is a fish. The species is a common, though large, fish called Diplomystus. This fish has amazing preservation. I will be working on it for a while. Let's start with some pictures.

The skull piece (left) of this Diplomystus specimen was previously prepped by collector (AS1). The lower left corner has a small, loose triangular piece on top of the skeleton. Remember that collectors will split rocks open in this area to reveal the fossil. The small triangular piece (AS3) has a bit of remaining skeleton/bones on it. The large block on the right, with no visible fossil, is the AS2 block.

This is the AS3 piece, showing what bones were left on it when split. How do we connect it back to the original fossil when the pieces are so small?
August 31, 2020
Today, I thought I would try a technique that is used in fossil prep where you glue the piece to the original specimen and approach the few remaining pieces from above. I glued AS3 to AS1 a couple of days ago. Now I am ready to work on revealing the rest of the skeleton. This technique has some similarity to the second lizard fossil, where I approached from above by removing the overburden.

Picture of me using an air scribe tool called a Microjack #4 on AS3 that was glued to AS1.
These tools work much faster (in prep time of course), so after about 60 minutes of work the specimen looked like this. But maybe you can tell that some of the bone is reaching over the edge and still looks pretty unstable. I decided to do another technique that is new to our lab: make my own matrix putty to help stabilize the pieces reaching over the edge.
The specimen after further preparation.
September 5, 2020
Last week I mixed up some of our adhesive that was very thick and added some Green River matrix, which is the tan rock around the fossil. When I remove matrix, I save it, then grind it into a powder. One could use many different ground materials in your matrix putty, but for this fossil it looks just like the surrounding rock. I applied the matrix putty to the underside of the bones that were sticking over the edge for support. I also added a bit under the separated AS3 bit so I could remove more of it.
It is difficult to see, but that is the idea. On this side view you can see the tan putty under the edge of the fossil. It will harden into a rock-like substance that is reversible.
This is a photo I drew on to show you my progress and my plans. The red line outlines the old AS3 piece, mostly removed. But unfortunately the purple line is a crack that developed because the piece was not supported well enough. Hence the addition of the matrix putty in the previous photo. The yellow circle is my plan of attack for next time.

My plans for the next stages of preparation.
September 7, 2020
This is very slow work. I make progress in millimeters rather than inches. Especially with this specimen, since most of this work is under a microscope. But microscope work has some advantages. As I worked over the skull and cleaned up the fossil I noticed microscopic teeth on the fish’s jaw. I can barely see them with the naked eye but here they are from a microscopic view. Look for a row of sharp, pointy bones.

View of the fish fossil’s teeth under the microscope.
Here is another thing that is more difficult to see with a picture, but amazing to see during microscopic prep: There are layers of scales that are preserved with the fossils. Do notice the different patterns in this photo? Each is a different microscopic layer of the fish.

The fish’s preserved scales.
Working under a microscope can be hard on your eyes, so I try to take breaks. One of my jobs pre-pandemic was helping people identify fossils that they discovered in bins in the Museum’s Fossil Lab. No, not the Prep Lab. I know it is confusing. The Prep Lab is a separate room where trained staff and volunteers prep fossils. The Fossil Lab is an area in our museum that has hands-on activities, one which is fossil collecting. Unfortunately, the Fossil Lab is temporarily closed.
We wanted to make sure visitors did not miss the fun of searching for their own fossils, so I made up bags containing a fossil, a sheet of common fossils, and a label with at least one of the fossils circled. I wanted it to be a bit of a game. It is the visitor’s job to find that fossil and confirm it by looking at the common fossil sheet. I hope that visitors will still get to “discover” their fossil with these bags. So if you visit the Museum, you may see me sitting in the Prep Lab window surrounded by bags and fossils. You can pick up a ticket in the Fossil Lab to take to the Admission desk to collect your fossil bag.
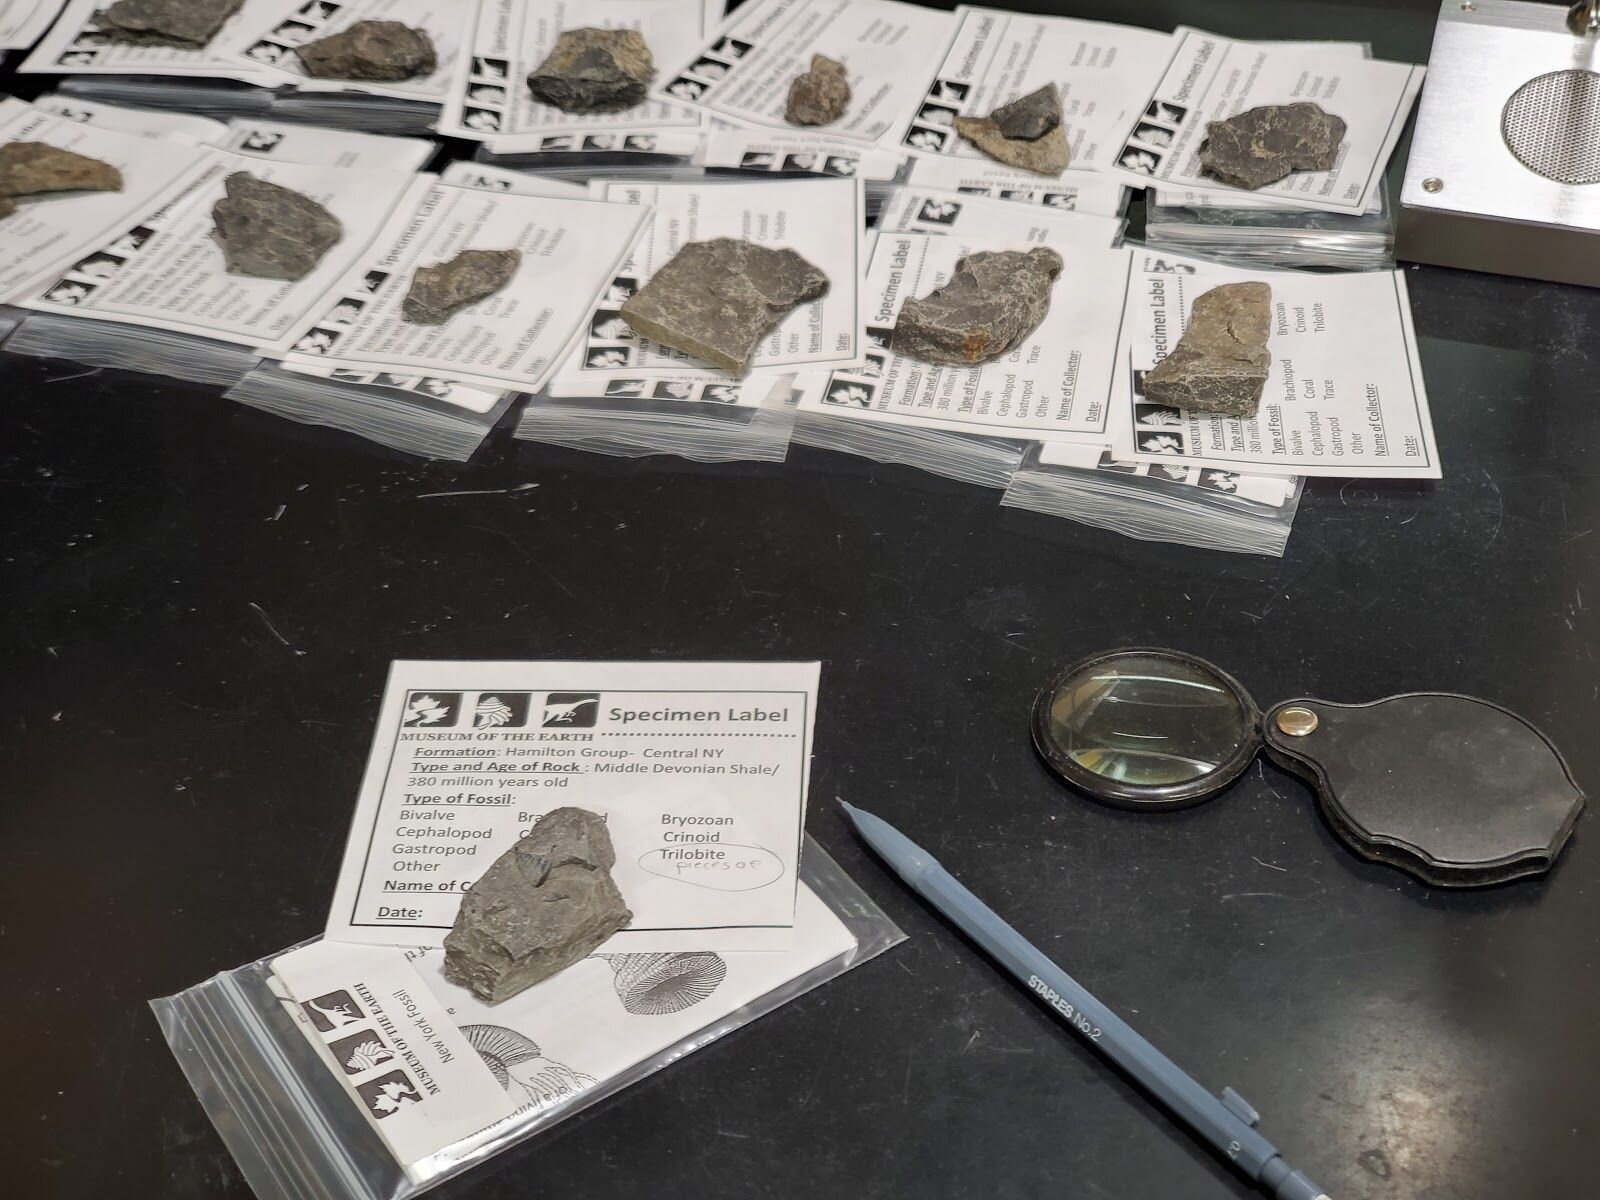
Devonian fossil specimens from central New York.
Everything takes time in fossil prep, so I need to make sure I have many side jobs while I rest my eyes and hands or wait for adhesives to dry. There is a saying in Fossil prep, “If you want it bad you will get it bad.” One needs to be willing to be patient to make sure the fossil is prepped correctly. Many people have trouble with this profession because they are not willing to take the time.
Next week I will work on this area of the fossil.
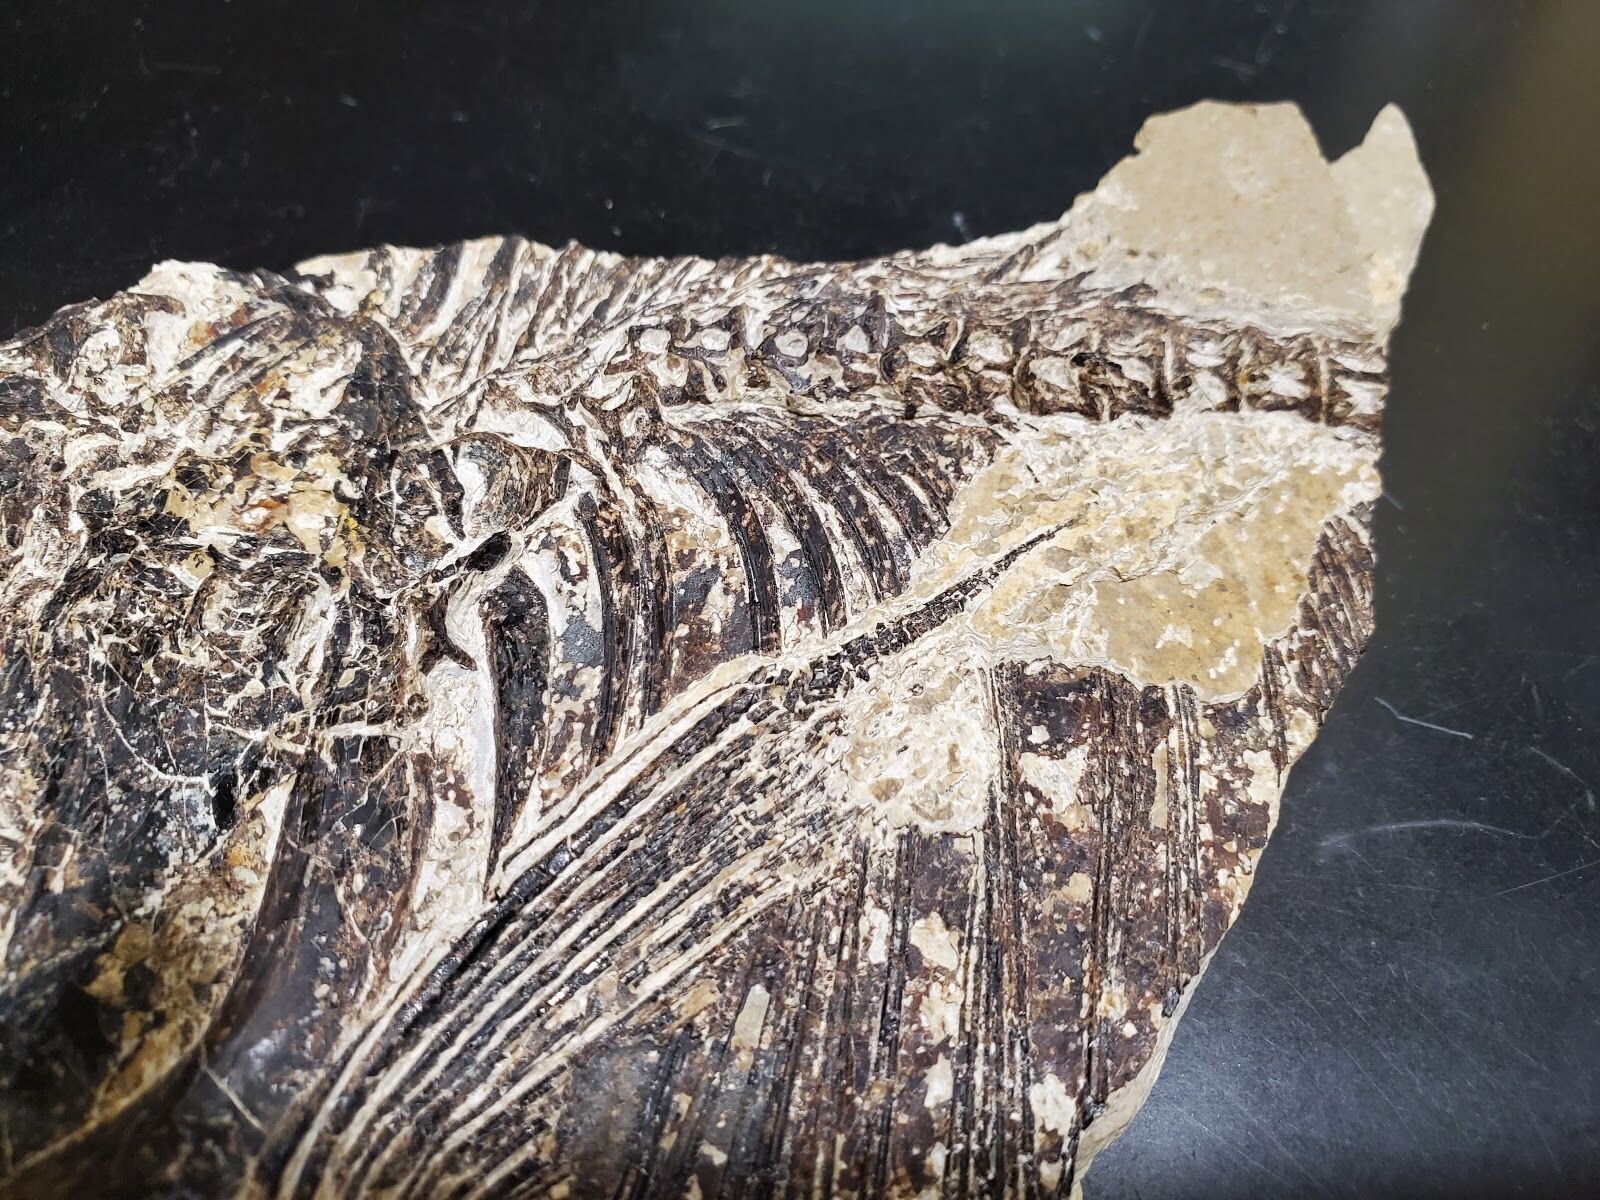
The next area of the fossil fish that I will focus on preparing.
September 13, 2020
I worked a bit on the dinosaur scapula on Sunday. Mike D had family obligations, so since we have declared Sunday “Dino Day” I thought I would contribute to that while I was in the lab. The scapula has broken bits all through the exposed part. It is like cleaning your bedroom. I had to go meticulously through each part and inspect for loose pieces and debris. I also glued a few loose pieces together. Remember, gluing two bone pieces together takes some time. Once I got them in place or set up, I had to wait for the glue to dry, so I had to go do some other tasks. One of my tasks today was organizing this blog. When I could I sit down and put in pictures or updated the submission. My work is like waiting for glue to dry. Really.
I also worked under the Microscope on piece AS1.3 of my fish specimen. I am almost finished with it. Here is the latest picture.

Continued preparation is revealing more of the fossil fish.
The top right area is what I worked on today. I have almost completed exposing the fin and vertebrae. Tomorrow I should be able to pick away the remaining matrix in that area. This is a beautiful complete fossil and I am so happy to be making it more beautiful, even if it is a face only a mother could love.
September 14, 2020
The weekend is almost finished and I have completed AS1.3. I thought I would explain the numbering system I have been using to talk about my specimens. The Prep Lab has its own numbering system (Prep Lab #). The Lab’s specimens are used for training volunteer preparators and often are used over again. They are not research specimens. If I get something in the lab to repair or prep for research, for the collections, or for exhibit, that specimen will have been given a number and I continue to refer to it with that number. But these specimens are on loan and will be leaving the lab. I assign the letters by the loaner’s name and then depending on how many pieces. My current project had three pieces. But I attached AS3 to AS1 and essentially removed most of AS3, so now the combined pieces are AS1.3. Notes are important to keep and this helps me remember the process.
I worked on AS1.3 under the microscope and finished it. I then applied a light coat of a consolidant to preserve it. Here is the finished piece. To compare what I did, check out the fossil on my post from yesterday.

Specimen AS1.3 in its finished state.
Next time I thought I would cover a complex topic: adhesives and consolidants. Afterwards, we will jump into starting the other piece: AS2.
September 21, 2020
Today I worked all day on a tiny, 4 cm fish fossil that I found hiding near the large fish fossil I am currently prepping. A couple days ago I started on the other block, AS2, of my current project. AS2 has not been worked on at all, but the sides of the block reveal the skeleton within. There is evidence of the spine through the block so I started the technique I used on the lizard fossil. I debulked about ⅛ inch down. I did it in a grid pattern so if I found something in this layer I could identify where it was since it will need to be removed to get to the main fossil. I still have a few more layers to go. These fossils are easy because the entire fossil is positioned in a very thin layer. Once you get to that layer, you have arrived and the trick then is to stay at that layer, which is only a few sand grains thick. It will take me another round with the air scribes to get to begin my work by hand.

AS2 gridded for planning my future work. I may return to this photo as I prep the block.
I always go slow when I debulk. One never knows what will appear in the layers. This is just what happened to me during the debulk of this specimen. The large fish I have been working on may run 15 or more inches, but as I was meticulously removing the top layer I discovered a small skeleton of a fish. It was less than 2 inches long.
This is the discovered fish skeleton. Check out the grid above. It was found in section Df (if you look closely at that whole piece you can see two small brown specks which are this fish). This piece was removed carefully to maintain the full skeleton. It is now numbered AS2.Df. Also note the tool marks. They reveal the ⅛ inch removed from the top of AS2.
I put away the large fish for a break and started on AS2.Df. The prep was all completed with a hand tool called a pin vise under a microscope since this skeleton is only 4 centimeters long. I had suspected that it might be missing its tail, and as I cleaned it, I found out I was correct. I worked most of the day on this. Taking breaks for hand and eye rest. I also realized today that I hold my breath a lot while working on these tiny specimens. So I concentrated while during this task and tried to breathe evenly. I need all the brain cells I can get. I am not getting any younger. Here is a photo of the fish after about 2 hours prep. It was so thin and small that I don’t have a tool small enough for a better prep. But you can see the ribs, fins, skull bones and vertebrae now. I hope you can see its fishy parts better than in the earlier photograph above.

Finished mini fish skeleton.
September 28, 2020
It was a busy weekend for work in the Prep Lab, but not for specimen work. Since I did not have any progress to show you I decided to go back to my first specimen. I have wanted to explain something I said in a very early blog post. In the 8/9/2020 post, near the end, I mentioned that I thought I was approaching the specimen from below, or at least from the bottom of the animal (another name would be ventrally). How did I make that assumption? I started my career as a veterinarian. Through many years of change I ended up teaching in a natural history museum and working in its fossil prep lab. My husband said I have worked with all tangible things: animals (as a vet); vegetables (I spent a couple of my post-vet years working at a garden center); and now minerals, rocks, and fossils. We grow each day, adding new skills and knowledge. By holding on to past knowledge and adding to my previous education, I have been able to make this change. I use my knowledge of animal anatomy in the lab all the time. The example below shows that this is the case.
Let’s talk about the anatomy of a vertebrae. The photo below is of a lumbar or back vertebrae of a deer. Vertebrae have holes in them to allow for the spinal cord. They might have projections called processes from the sides (lateral or transverse) or top (dorsal). I have labeled this vertebrae below to show you how a mammal vertebrae is arranged. Depending on where it is on the spine will determine the size of the processes. There is also a thicker portion below that is more solid, providing structure and support for the bone. It is also where the next vertebrae would connect, There is usually some type of disc or shock absorber between. This should be enough information to work from. It is good to understand that most vertebrate animals show some variation in this. Understanding how a vertebrae would look in any direction is where I am going with this.
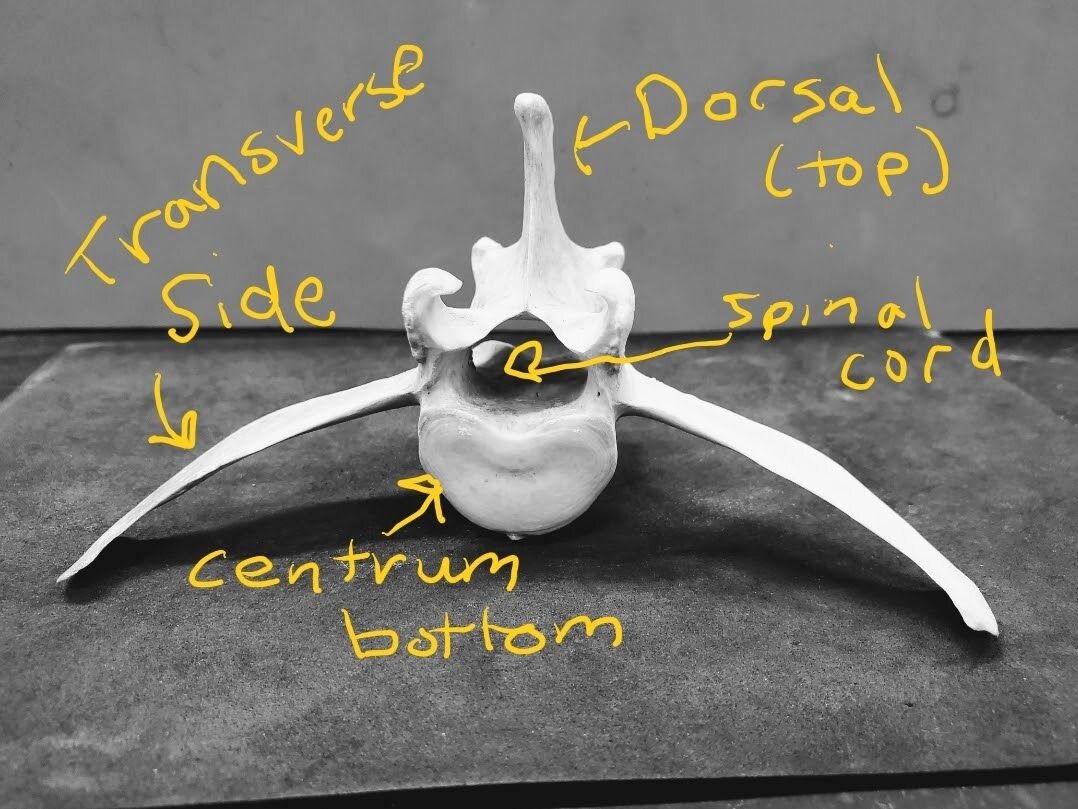
Photo of a deer lumbar vertebrae taken from the rear.
This leads me to my previous post and the direction that I think I approached the lizard skeleton. As I was cleaning the fossil, I never saw any dorsal process throughout the entire skeleton. Most of the vertebrae were broken and crushed, but here are a few photos of very close views. The first one is of the beginning of the tail vertebra. I think we are looking at the centrum from below, as there is definitely no dorsal processes showing. The next photo is of ribs, so these would be the vertebrae in the chest area. In vet medicine we would call these thoracic vertebrae. These are pretty crushed, but they look smooth like we are looking at the centrum again.

Close up photograph of the lizard’s tail vertebrae.

Close up photograph of the lizard’s vertebrae and ribs.
A bit of knowledge about anatomy is important if you are working on a rare lizard skeleton, a dinosaur bone, or even an ancient clam. That helps you understand what you should expect in the next layers and hand stroke. I expect my preparators learn about the animal they are working on as I teach the preparation techniques needed for the specimen. I had suspected the lizard was a juvenile as I worked on it because of some of the characteristics of the bones. Sometimes in this field you are working on anatomy no one has ever seen. But just as I used a deer bone for demonstration in this blog post, one can use other animals to learn about what to expect during the preparation of a specimen.
October 10, 2020
Working as a Prep Lab manager has far-reaching responsibilities in this institution. Beside my day job of Museum Education, I also care and watch over the specimens on exhibit. A few years back I realized that no one was actually cleaning the exhibit fossils. Oh yes, we cleaned the exhibits and the Museum, but not the actual fossils. It turns out that specimen care and cleaning is a special museum job and I was perfect for it. Put another notch in my belt for taking over the responsibility. My day job is being the Museum Education Manager. My second job is to manage the Prep Lab. I train everyone who works in the lab. Some need a lot of training, some very little. But when I decided I would take on the job of caring for the Museum exhibit specimens, that required cross-coordination with other departments. In a Museum of our size, the exhibits are created and maintained by the exhibit department and the actual specimens are cared for by the collection department. I do not belong to either so I had to delicately approach each and ask for permission. I got a big thumbs up from both because, I think, everyone wanted it done, just didn’t have the time to do it. Well I did not have much extra time either, but I had the power of dedicated trained volunteers. I asked a couple of the Prep Lab volunteer preparators to help and they jumped at the chance. Who knew I would not have any trouble recruiting help. Museums and institutions such as ours completely depend on volunteers to keep our doors open, and to clean our specimens. The two fossil preparators had time and had been taught to handle fossils delicately. I just had to show them how to do the cleaning for each type of fossil and teach them how to document their work.
We started out cleaning and documenting the small fossils. We found many that needed to be put on the list for future repair or at least to keep a record by photography of progression of the damage or condition. Many times no attention is needed. Other times we pull the specimen down immediately. We take the specimens to the Prep lab for repair or upkeep. As well as specimens, we note if an exhibit needs some help, for example if there is a missing label or a broken sign. It had been almost 15 years since anyone had done any of this and we created quite a database of things needing attention. We would send the information to specific departments. We were only responsible for cleaning and documenting. By starting this process we could return yearly and keep track of items and specimens that needed our attention.
The really cool work came when we got to do the large skeletons on display. We worked on vacuuming the Right Whale skeleton hanging in our entrance in May 2018. We still need to address this since we only got to the head or skull before we lost the maneuvering space below.

Deb and Bill work together on cleaning the whale skull (2018).

View from below of the whale skeleton cleaning (2018).
We had to set up scaffolding and preparation to clean and inspect the Mastodon skeleton, which was done in November 2019. I had prepared to help, but also talked to visitors. Because of this I stayed on the ground. Maybe it was also my acrophobia (fear of heights) that convinced me I was needed on the floor. I put a vertebrae on the table for Museum visitors to hold.

We set up scaffolding around the mastodon skeleton to help us safely clean the specimen.
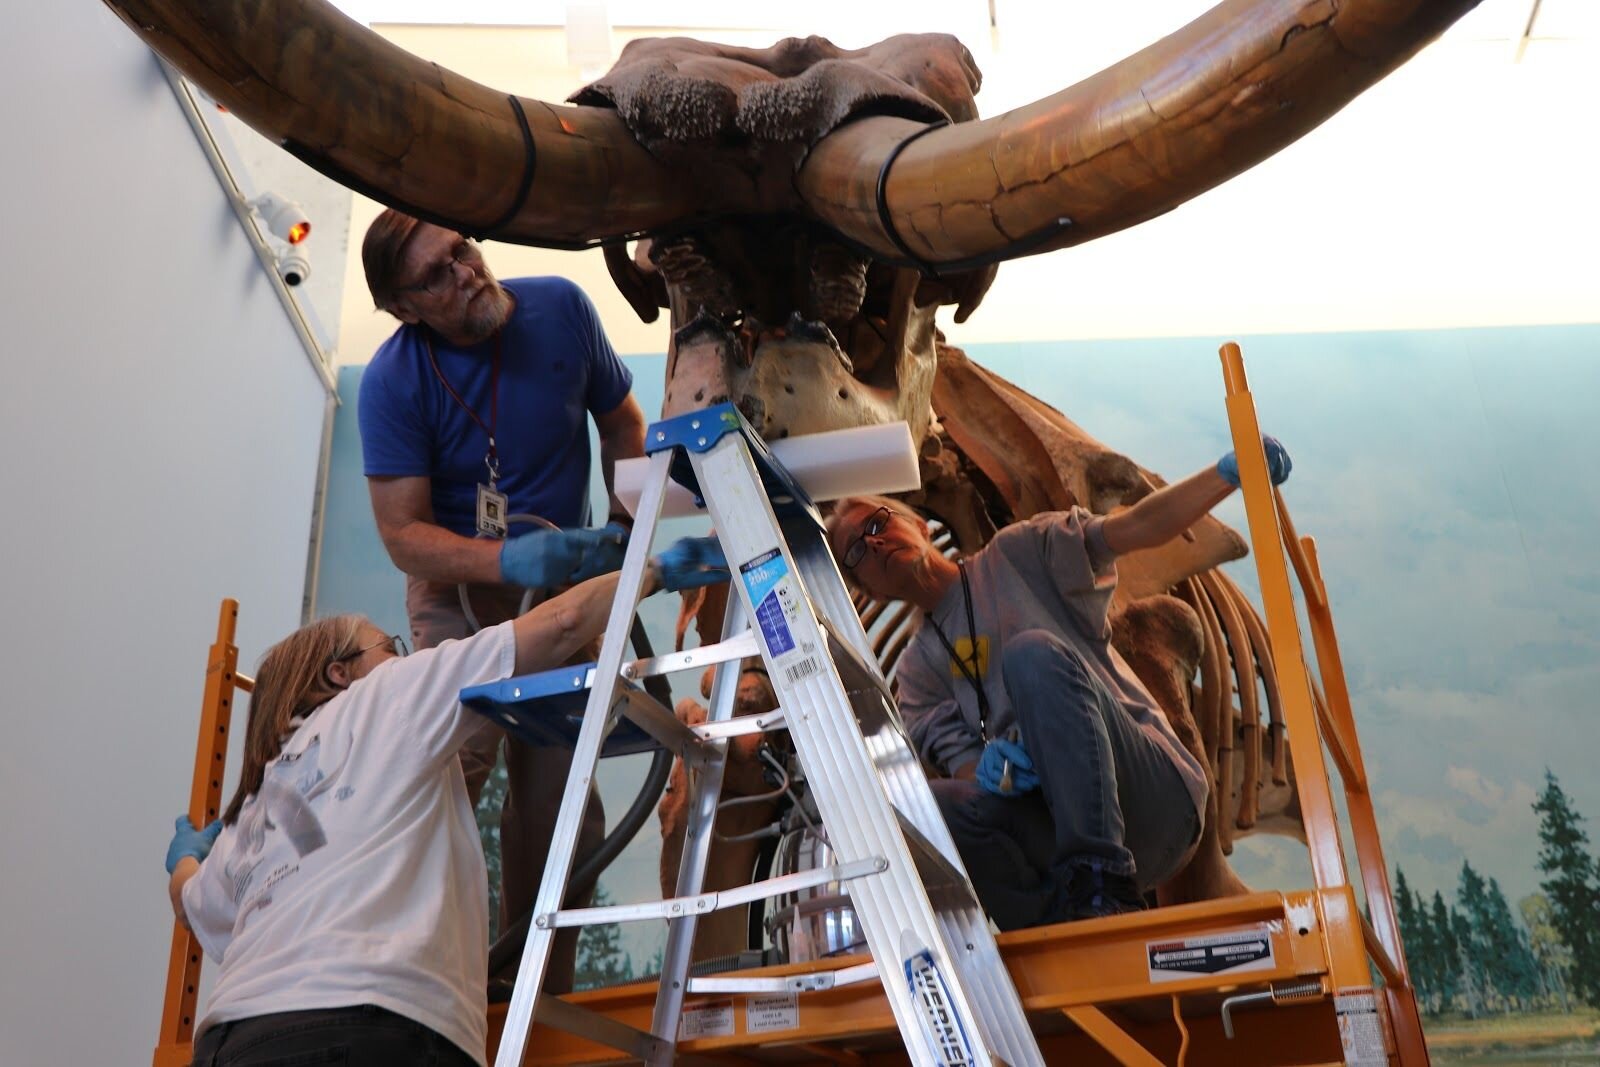
I stayed below to help both volunteers and talk to visitors to explain what we were doing.

Vacuuming and brushing the dust. The vacuum is hepa filtered, so as we brushed the dust it was filtered out and did not affect the volunteers or return to the specimen. We will wear masks if there is worry of dangerous materials though.
We found the mastodon was in very good shape even though it has been on exhibit for many years. (Learn more about the mastodon here.) That was a sigh of relief for all involved. But as we worked on the skeleton we damaged the floor in the exhibit. Deb stayed behind to work on the floor to repair cracks and repaint areas, while Bill continued with cleaning and documenting.
Our next large specimen that we had noted needed repair and attention was our T. rex skull, which we worked on in November 2019. This story keeps getting more interesting. Our T. rex skull had been in the institution for some time now. It had been carried around to offsite events for education programs before being assigned to the exhibits. But all that handling was not kind to the skull, which is an artificial cast, or copy of the original skull. In the fall we decided, with the Mastodon completed, we would tackle the skull repair. But it hangs from the ceiling by wires. After taking photographs and coming up with a plan we decided to just leave the skull up, but create a more support system for it so we could work on the skull safely: safe for the skull and us repairers. Once we got it stabilized, we vacuumed and cleaned it and inspected it more closely.

Here is a picture of Deb vacuuming the skull.
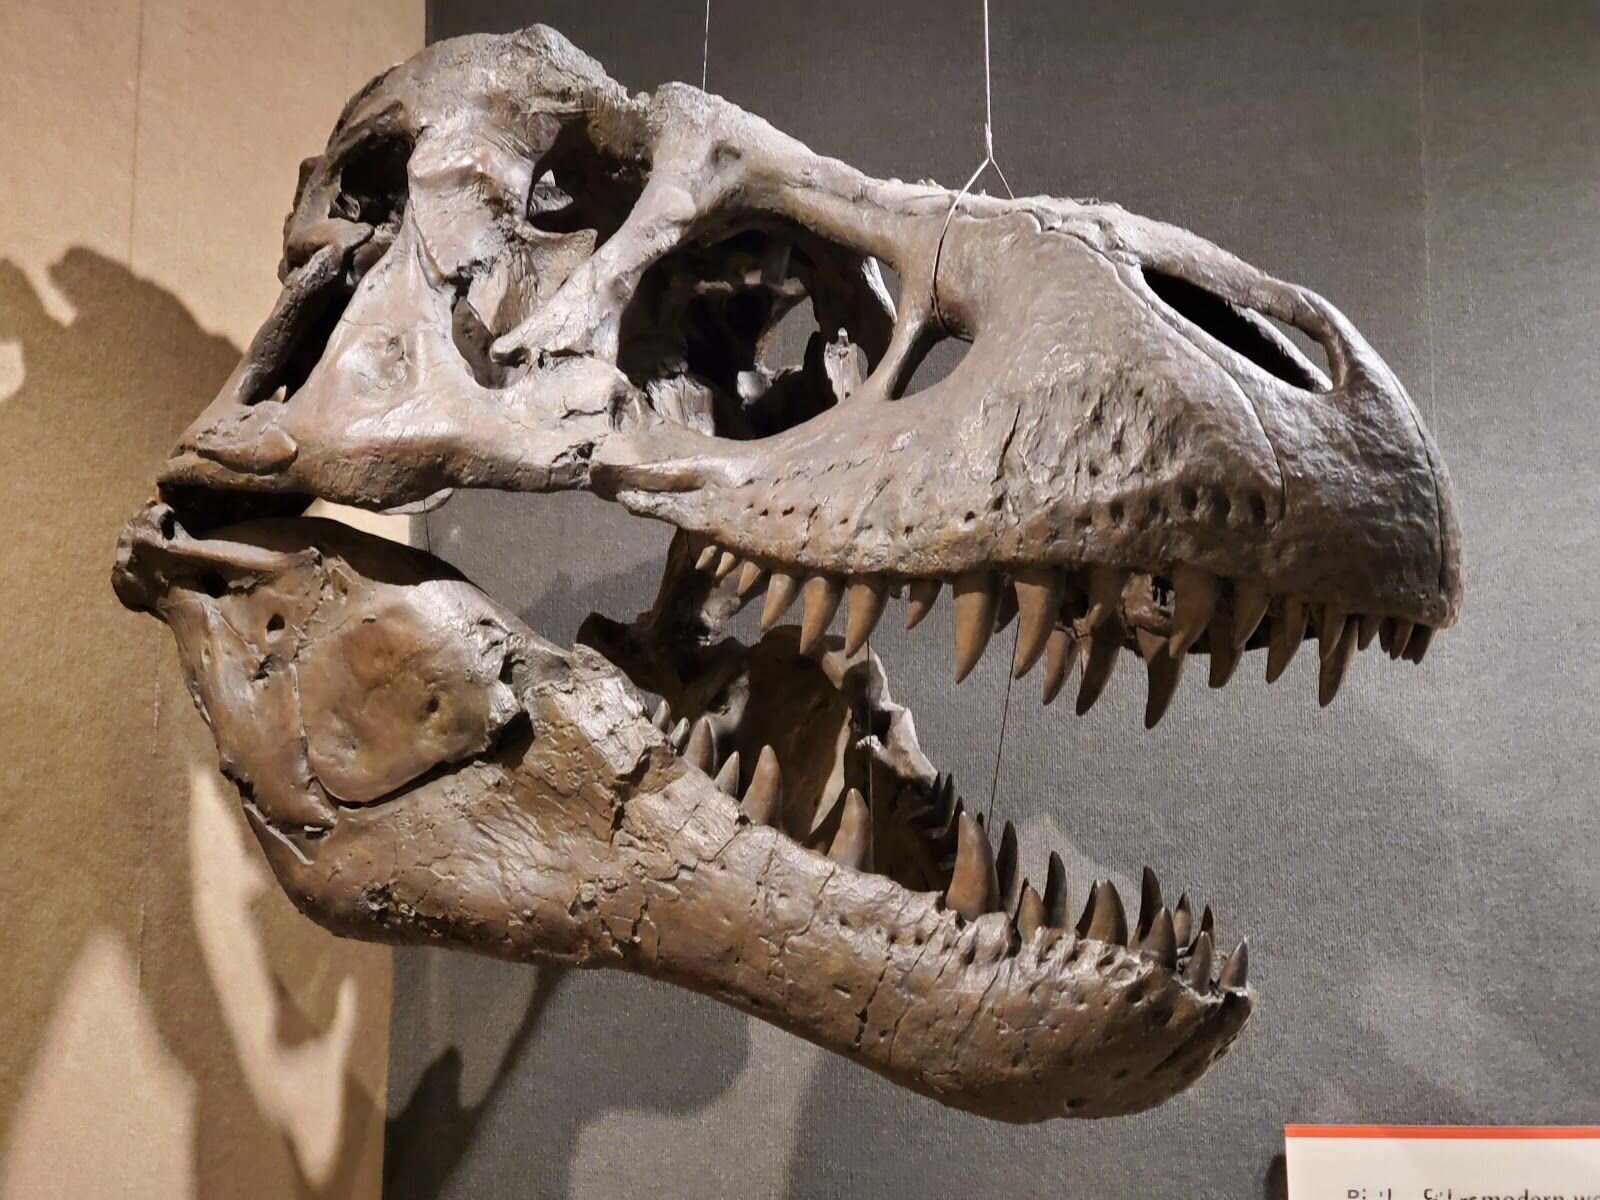
Cleaned and repaired T. rex skull “Stan” on display.
We found the jaw was completely broken at the left joint and at its symphysis as well as several teeth. This damage in the back caused it to hang askew and created more cracks and damage to the cast. I am not sure how long it had been broken but upon inspection we found several previous repairs. This is a cast, not actual bone. So I was not working with stone but composite foam materials. (This was also why we could hang it by wires.) I used epoxy that was pliable and filled in holes, teeth, and cracks and repaired the break with epoxy and wire. After drying, Deb worked her wonders on painting. She is an artist with a great eye for color. She matched it perfectly and made it look like new. Once it was done, no one was the wiser but I was one happy preparator! I had noticed these problems the first time I had visited the Museum. I guess I notice broken fossils. They did not have anyone at the time to repair it. I was so thrilled to be the one to do it. I have a great job!
Below is an interactive 3D model of our T. rex skull; the model was made before the skull was cleaned and repaired.
My last bit of information and maybe my reason for writing this blog post is that while I was repairing the skull our director Warren Allmon came in to see its progress. He mentioned it was a cast of the skull of “Stan” the dinosaur. I did not think much of that at the time, but recently Stan’s skeleton sold at a Christie’s auction for almost $32 million dollars! So even though it is a cast it was the closest I ever got to a famous dinosaur, or at least working on one. Now you can stop by and view the skull of a highly priced dinosaur. Maybe take a selfie with it. It is a beautiful specimen. So amazingly preserved 67 million years after its death. The skull reigns over the Cretaceous life in our Museum even now.
November 9, 2020
How about we recheck my progress on the Green River Fish specimen AS1, which I started at the end of August. I finished the AS1 piece, which was the head/skull of the fish. (See 9/14 post to view the finished part of AS1.3, which is a combination of the AS1 and AS3 pieces.) A couple of months ago, I started prepping the unworked piece of AS2 (see 9/21 post). A few of the previous posts discussed the process of debulking above the actual fossil. I went down about one-eighth to three-sixteenths of an inch into the matrix. I used an air scribe tool called a Micro Jack #4 (purchased through a company called PaleoTools) for most of the time to achieve this result. These tools connect to our compressed air system in the lab.

A Micro Jack #4 air scribe tool.
This is a slow, measured process. Because I moved through systematically and slowly, I was able to find the small fish skeleton in those layers as I carefully removed the matrix. (You can read more about that in the 9/21 post.)

In this GIF, I am using a larger tool than the Micro Jack #4. It is called a Chicago Pneumatic. I was using it in this area for speed since there was not a skeleton below to worry about.
I followed along in this grid pattern on the whole AS2 piece. The past couple of weekends I have started focusing on the skeleton and have gone back to hand tools. Below are a couple of the pin vises that I am using; notice their different sized needles. I’m also using a brush to clean up the work area. These have been my main tools lately, beside the microscope.

The pin vises and brush that I am using for this prep work.
Can you see the rectangular area that I have exposed? I remove the matrix in a grid pattern as I work. Here is the progress I made on AS2 over the past four work days, which probably adds up to about 16 hours of work. I have exposed sections Ae and Be on AS2, and in the process discovered many fine small bones that made up the dorsal fin of this fish.

Exposure complete in the Ae and Be section of AS2.

This photo is a close up of area to the right in the previous photo. You can start to see the amazingly small bones that make up the dorsal fin. The dorsal fin of a fish is on top (or, on its back). We are viewing it upside down in this photo. Sorry I did not put scale on this photo. It is about 1 inch by 1 inch in size.
I think I will do some more debulking and exposing of layers for my next couple of days in the lab. If I want to do prepping correctly, I must stay focused and go slowly. But maybe we can change the subjects for my next posts since progress will be hard to see on AS2 for a while.
December 9, 2020
Back again to talk about a subject I get asked about a lot when people watch me work in the lab: How do you repair fossils that are broken? I thought I would take a “break” from my Green River Fish specimen I have been working on the past couple months and address this question by showing you a different kind of repair we do in the lab. I was recently asked to repair a fossil specimen from the teaching collection. Gluing fossils back together again is a different kind of preparation compared with what I have covered earlier. When you repair fossils you hope you have all the pieces. Have you ever picked up a broken vase you dropped and wanted to repair it, but weren’t able to find all the pieces? Well, step into my world.
When one repairs a broken fossil there are many steps before the gluing commences. You do not just pick up a piece, find one that matches it, and glue them together. The first step might be to question if it needs to be repaired or even why it is broken. Some fossils would store better in several pieces and it allows the researcher to see the internal structure. But one should also assess why the specimen broke. Is it housed wrong? Did someone drop it? Did it move around too much in a collection drawer. One of my jobs is not only to fix a broken specimen but to try to make sure it will not come back to me needing to be repaired again. This is a worthy goal for my time and the specimens I work on. Every time a specimen breaks we lose some of its pieces and possibly some important data that cannot be retrieved. My goal is always to send a fossil back in better shape than I received it, and that will be revealed at the end of my blog.

The broken brittle star specimen prior to repair.
Let’s start with my specimen that I was given to repair. The photo above is what I was given to repair. It is an amazing, exceptionally preserved fossil of an extinct brittle star (relatives of starfish; learn more about brittle stars in our Digital Encyclopedia of Ancient Life). It is from a rock unit in Germany called the Hunsrück Slate (the link takes you to a Wikipedia page about this amazing fossil deposit). The fossils are from a time period that is slightly older than most of our Devonian fossils in central New York. But since we are talking about preparation, I will let you explore the paleontology of this area and this fossil on your own. I want to get back to how I repair this fossil to best keep it from breaking again.This fossil’s destination may be a collection drawer or it may be used for teaching, which would lead to much handling of the fossil in the future. These are issues I think about as I create my plan for repair. Just like my previous specimens, I need to decide the best steps to follow as I repair this fossil.
Looking at this fossil do you notice four pieces? While repairing a fossil is important to remember that it is a three dimensional shape. Look how the pieces stick out and overlap each other. Rocks are laid down in layers, so breaks across fossils tend to follow these layers. First one needs to see how they go together, see what pieces might be missing, and determine the order in which it would be best to put them back together. One advantage of this brittle star fossil is that it is somewhat flat. When putting together bones that are round and tubular, their three dimensions makes repairs much more difficult. So I practiced putting the pieces together and tried to find the original places for some tiny pieces in the box with the fossil. Once I was satisfied with the fit and process, the next step was to clean the broken, exposed surfaces. To get a very tight repair one needs to remove all the small dust pieces on those surfaces. Each piece was inspected under the microscope and cleaned. This rock is slate but only slightly harder than shale. But it doesn’t turn to dust easily, so cleaning was relatively simple. With a close-up view of the break you can see how the rock is cracked and unstable. You might also note the small squares of yellowish-white or gold color on the fossil. That is iron pyrite that is incorporated in the fossil and very common for this fossil locality.

Close-up view of the broken specimen.
Now let’s talk about adhesives. That is what we preparators call our glue. When we repair a fossil there are many things to think about, but most often is how reversible is the adhesive. That may be the last thing you are thinking about when repairing that broken vase. Probably the first thing you think about is the speed of drying. We think about that as well but sometimes speed is a bad thing.
When deciding on an adhesive for this fossil I had a number of factors to consider:
Since I wanted a very tight repair, I needed a thin adhesive. One that doesn’t take much room to glue each edge together. This is important for two reasons. As one attaches pieces together with adhesive, that adhesive takes up space. Think back to your vase repair. How many times have you gotten to the third piece and the next one just doesn’t fit, even though it had fit when you tested it! That is because you didn’t adjust for the glue space between the pieces. I wanted a tight fit for this reason but also so when viewing the brittle star, you could understand what it looked like.
I wanted a relatively fast curing adhesive, but not too fast so I could readjust the piece if needed.
Reversibility is important in all fossil repair. We need to have the ability to remove a piece if needed in the future.
I also considered the final appearance of the adhesive after it is dry and cured, including its shine.
I want to make sure this adhesive has been studied, is dependable, and will last for many years.
Lastly, I wanted to make sure this adhesive was stable and could take handling, for use in later teaching.
There are a lot of different adhesives that are used in fossil preparation. We have used the materials that art conservators have used for generations and tried to apply it to rocks and fossils. Many of the features of those adhesives are what I am looking for. A stable, long-lasting, dependable, reversible adhesive I can apply to my broken fossils. I have several in the lab that we use frequently and I go through this thought process every time I repair fossils. And believe me, repair is a common activity in a fossil prep lab. I require my preparators to make up a batch of adhesive for each new specimen they start to work on, “just in case” they need it. It turns out the adhesives we mostly use need to be mixed and it takes about 24 hours for them to be ready to use. Since sometimes one cannot plan on having to repair a fossil, it is alway best to make sure you have some on hand.
There are essentially two kinds of adhesives we use in fossil preparation: reactive and reversible solution.

Paleobond, a reactive adhesive.
One is considered a two part (though the two parts aren’t always obvious) adhesive. They go through a chemical reaction to become hard and stable, starting out as a liquid or semi-solid. These are called reactive adhesives. Some of these are epoxies and cyanoacrylates, or super glues. The two part epoxies are obvious because once you mix them together they start to cure and get hard. These are great in fossils if we have a gap to repair and need structure. Remember those missing pieces? Yeah, we have a lot of those in our repairs. Super glues are also helpful in fossil repair as well. They work well if the fossil is a bit wet. They seem to penetrate fossils well for stability. The reactive adhesives are commonly used in fossil repairs and are preferred by some preparators because of the ease of finding them. Many can be bought at your local hardware stores. The problem with these, however, is that their long-term durability is not known or has been shown to be poor. I am commonly having to go repair a fossil that was repaired before with an unknown epoxy. These epoxies often become brittle and retract from the fossil repair. This is not what we want for our fossils that we plan on researching and curating for many years from now. The other negative is that these are not reversible. To me that is the most important fault. Though I will use them, I want to make sure my repairs could be reversed and improved. Those epoxy removals require me to use air scribes and mechanical means to remove them. I always state the adhesive I used on a fossil on my repair log so a researcher will know in the future if it can be removed or moved into another spot, just in case I make a mistake in repair. Another way around it is to use epoxies, but coat the exposed ends with a reversible adhesive so the epoxy becomes reversible. The picture shows a brand of reactive adhesives we use in our lab. These are premade liquid mixes produced by Paleobond and are very easy-to-work with epoxies.
So what is a reversible adhesive? This can be a complex topic that most of you probably are not interested in. (If you are, I would recommend this paper: “Paraloid B-72: Practical Tips for the Vertebrate Fossil Preparator” by Amy Davison and Gregory W. Brown.) A reversible adhesive, or solution adhesive, is a stable solid polymer that liquifies when a solvent is mixed with it. The solvent is volatile and evaporates away. Once it is evaporated, the adhesive becomes solid again and glues your pieces together. The solvent choice will depend on how fast your adhesive cures. You mix these yourself, so you can create the viscosity of the adhesive you want.

Beads of the solid adhesive Acryloid or Paraloid B72 before mixing. These are an acrylic co-polymer (for you chemistry nerds, ethyl methacrylate/methyl acrylate). It is very non-reactive to the fossils. This compound has been studied for years and is very stable for at least 75-100 years. It is sensitive to UV lights, so we need to think about storage of these fossils after repair.

Beads of Acryloid and acetone.
It turns out that the brand name of these pellets have changed to Paraloid B72 from Acryloid B72, but they are so stable that our Acryloid batch that we bought many years ago still works great. Our most common solvent is acetone, but we also use ethanol which results in much slower cures. Most of the time we need faster results.
Another fault of these adhesives is that they will soften in heat, but we often use this as a benefit. It has to be pretty hot, but when you put pieces together and that last piece just doesn’t fit right, sometimes all you have to do is point the hair dryer at it and nudge it into place. There are other very cool things we can do with this adhesive, but for this specimen they aren’t necessary to talk about.
I mixed up a very thin adhesive Acryloid B72 for my repair. Using the microscope, I cleaned off the edges and applied the adhesive and glued them in the order that fit my plan. Once they were all together I found another problem. The edges along the breaks were exposed because I was not able to get perfect apposition (or, positioning). I could feel the sharp edges and was afraid they would chip away with handling. I needed to amend my plan. I would need to fill the small gaps and seal the edges along the cracks, but this would make the adhesive more obvious. One of the disadvantages of Acryloid B72 is that it is very shiny when dry. I needed a similar adhesive that was not as shiny.
Using a very precise syringe and needle (see photo), I applied another reversible polymer resin adhesive called Butvar B76 to fill in the cracks. When it dries, Butvar is slightly less shiny, so I figured it would not show up much. I just repeated the application until I had the gaps filled enough to make it less likely to chip.

Application of adhesive using a syringe.
Another technique that I used on this specimen is incorporating fabric or paper to the repair. I infused a nonreactive polyfabric with Acryloid B72 and bandaged the crack on the back. I added more adhesive to the fabric once applied, and now dried, that break is very stable.

The back of the specimen was bandaged with nonreactive polyfabric.
Since there is no fossil on this side I am not covering up anything and since it is applied with a reversible adhesive it can be easily removed.

The repaired brittle star specimen.
The photo to the above is the finished specimen from the front. The cracks are still visible, but the delicate structures of the animals are very easily inspected.
The last part of my work on this fossil was to make sure it won’t break again. I examined the fossil and found that there was part of it that had some layers missing. That would allow for someone or something pressing on it to stress and break the specimen. This was probably the reason for the original breakage. If you look at the photo showing the fabric bandage, you will notice the top left corner of the specimen has a layer missing. So, there was no support for that region when it was sitting upright. I needed to fix that to eliminate future breaking. This was easily done with foam support in the specimen’s box under those areas. I also put some extra support around the edges so it would not move around in the box. Now repaired, the specimen can go back to our collections and be used as a teaching specimen.
The specimen housed in its new protective foam-lined specimen box.
Current Post
January 2, 2021
Wow, we made it through 2020. During the pandemic, many paleontologists were unable to get into the field to collect new fossils. Lucky for our lab, our dinosaur fossils were collected over 100 years ago. We did not have to wait for anyone to collect them. As mentioned in a previous blog, we get blocks of Dinosaur National Monument rock that had been collected by Carnegie Museum of Natural History paleontologists from its Carnegie Quarry in Utah. (See 8/10/20202 blog for more details.) The Carnegie loans these DNM blocks to PRI because they have literally tons of rock from this quarry, most which will not be opened for a very long time. But also, we (PRI) have a special relationship with Carnegie’s vertebrate (dinosaur) paleontologist, Matt Lammana. Matt grew up in Central New York and was raised in Waterloo, NY. The CMNH loans us a DNM block for two years and if we do not finish the job, we can renew the loan. This year we renewed our loan on DNM block 165a & 165b for another two years because the pandemic put us behind in our preparation work on the specimens. Sundays I have one of our volunteer preparators work on the tibia (DNM 165b) and it is coming along nicely. We are getting close to putting some of the large pieces together. But the Apatosaurus scapula’s (DNM 165a) preparator has not returned to the lab. A couple of weeks ago I decided to start on its preparation. If you have been following the blog, most of my work in the lab is under the microscope using hand tools such as pin vises and brushes. The scapula would take a completely different approach—well almost. Working under the microscope requires slow, measured work with attention to detail. Working on the scapula turns out to need slow, measured work with attention to detail, just without a microscope. (If I had a microscope that could be used over the bone, I would use it!) It might be that I am completely qualified to work on it! Good thing I am the manager of the Lab and assign the specimens—“Maureen, You are assigned DNM 165a! Get to work.”

Right Apatosaurus scapula (DNM 165a).
My first job was to take pictures and make a plan. Once I had a plan, I cleaned up the specimen and strengthened the surrounding matrix that was very cracked. I applied epoxy to the matrix cracks so that the fossil had support from below. That way as I remove the plaster jacket surrounding the fossil to expose and repair the bone (which was one of my first steps), it would still be supported. Remember one of the jobs of a preparator is do no harm. I need to think about what each action of the process does to the fossil. Sometimes that action can be far from the actual area that you are working on. I may have mentioned that at the field site a preparator and paleontologist will encase a fossil in a plaster jacket. That is supposed to keep the fossil safe during transport. In the lab, to get to the fossil, we remove the jacket. BUT not all at once like a doctor may do for a healed bone. We slowly open the jacket by removing small pieces. First it is to examine the fossil’s condition and to see how thick and what condition the jacket is in. In the case of the DNM 165a scapula’s jacket, we were not encouraged. Mike M, the previous preparator, had done a great job exposing the bone. But he was always grumbling about the process. With each jacket piece removed, new problems were revealed underneath. It turns out the process of jacketing wasn’t always followed to the letter in the field 100 years ago. Usually plaster and burlap is applied after a separator is placed next to the fossil bone. That way the bone does not come in contact with the plaster, which is very difficult to manually remove from a fossil. Sometimes it is paper or paper towels, even a t-shirt will be sacrificed. Most of the fossils we have worked on from the DNM have had some type of brown paper as a separator. When it was time to apply the jacket for the scapula, they must have run out of paper because so far all we are finding is a gauze separator. If the idea is to keep plaster away from the fossil, I do not think gauze was a great choice. You probably can imagine what happens now. Yep, plaster stuck to the fossil.
Here is the scenario: Fossil bone attached to its plaster jacket for 100 years, having been moved to Pittsburgh from Utah by train, then probably multiple moves in the institution, and finally to PRI by truck. This jacket has been in a very sturdy wooden crate all that time but we are finding that the jacket might not have protected it all that time. All the small movements during its “lifetime” would have transferred directly to the bone and rock. Thus we have a very cracked bone and rock from this 100 years of movement and settling. The process will be to take the jacket off the bone which has been attached to it and not lose the attached pieces. We are discovering much of the upper bone is now tiny pieces and dust of bone from all those vibrations.

Cartoon by Jeff Martz explaining the process of applying a plaster jacket in the field.
This is my dilemma, and Mike’s before me. How do I proceed to open this jacket so we can access the condition of the bone and then make it more stable than we found it? That will be my job over the next couple years. I love the challenge!
I try to explain my thinking and planning process with this blog. You can come by and watch me or one of my volunteers work in the Museum Prep lab anytime that we are open. But I hope through the blog you get a better understanding of the thought process of a fossil preparator, at least this fossil preparator.
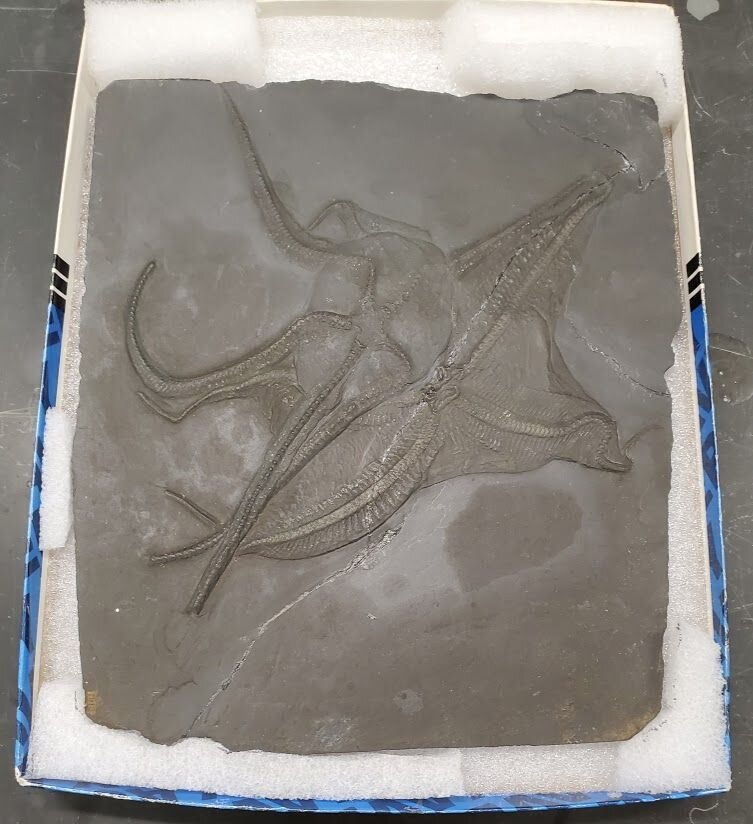
Here is a picture of the entire fossil from above. It still sits on its wooden crate and you can see the slats of wood. Only a small part of the fossil’s jacket is opened on the left end. We have it in a tent that will protect the rest of the lab from its potential hazards as we work on the fossil. Above left are air ducts that vent out the dust. I have a drawing of what we expect the fossil will look like and what part of the skeleton of the Apatosaurus it is from. The red bones are the fossil. I am sure you can see the very cracked fossil and surrounding rock that we are finding within the jacket. Most of these cracks already have missing fragments and will never form a perfect fit. I suspect there is a lot of dust below the fossil in the jacket. Sad.
Here is my plan. I need to support the fossil because as I remove more of the jacket, the surrounding support it provides will be lost. The plan will be to continue to remove strips of plaster across the fossil, moving to the right until the fossil is completely exposed. See the dark square in the middle of the bone in the photo above? That was where we first encountered the gauze and its destructive outcome. Mike had removed the pieces hoping to fix them and replace them back, but his work was stopped because of our shutdown. I had worked on some of the pieces before, so I thought I would replace them. My idea is to replace all the pieces to the area they first appear. I will try to get them in their best placement and apposition, but realize that many pieces are probably moved to elsewhere in the jacket or completely dust. I figure if I keep everything where they are supposed to be when I return I will not have a crazy puzzle to repair. In prep, we have reversible adhesives, so that was my first plan of attack (check out the 12/5/20 blog about adhesives): put pieces together where they should be and glue them in place with something that will allow me to change the placement in the future—the joy of reversible adhesives is that nothing is permanent.

Side view of the middle of DNM 165a.
The white material in the grey rock is a type of epoxy. It is filling in the large crack that runs through the whole block. I also applied Acryloid B72 thin to the rest of the rock as a consolidant that should harden it to help with support. I also plan on not going as low when I remove the jacket to keep the support around the middle of the specimen. Looking at this photo makes me think I need to add some more epoxy next time I am working on this specimen.
The picture below on the left shows the dreaded gauze still attached to the bone, after about a 6 inch strip of plaster was removed. The below photo to the right is a peek at the bone damage and debris stuck to the gauze.

Gauze is still attached to the bone.

There is bone damage and debris stuck to the gauze.
The bone was also stuck to the plaster, not just the gauze! The two pictures below show you some of the problems I faced as I remove the plaster jacket piece. Left picture, missing bone—right picture, same shapes of missing bone on plaster.

Close-up view of damaged bone.

A fragment of bone stuck to plaster.
Now to get them together. I consolidated the bone on the plaster with Acryloid B72 and waited until next time to remove and reattach them to the main bone. Patience wins out and I was able to do that with little damage.
This turns out to be more than a two day job, with further necessary repair down the road. I returned the previous removed pieces and straightened the newly exposed pieces. Then I applied a lot of consolidant to keep everything in its place. It is not pretty, but it is a start. See the pieces in their relatively correct spots in the photo below.

The first steps towards repairing the broken pieces on the Apatosaurus scapula have begun.
This is what happens to a bone that—though we tried to care for it after it was taken out of the ground— continues to degrade. I hope to open up the rest of the plaster jacket, which was put on it to protect it but has since been its enemy, and assess what we can do to preserve this amazing remnant of Mesozoic time. I will do my best to preserve the fossil. That is the job of a fossil preparator. This project will be a long and slow process. I hope to work on DNM 165a on Mondays for a couple of months. Stop by to visit the lab on Mesozoic Mondays. In the spring I have other duties that may take me away from this work but hope to be able to keep you updated when possible. I know this looks like a mess, but that is part of my job in the lab, to methodically repair and preserve fossils for future generations.