Bioactive Enclosures - Creating a Tiny Ecosystem

By Rose Zabel, Cayuga Nature Center Fall 2020 Work Study Student
Last updated January 8, 2021
Life in a terrarium can be very different from life in the wild. The natural habitat of a crested gecko is the rainforest canopy of New Caledonia, a grouping of islands in the Southern Pacific Ocean with a great variety of flora and fauna. Replicating such a biodiverse habitat inside a small terrarium can be difficult, but it’s possible to incorporate familiar natural elements, along with some new ones, in order to make a tank that feels more like home.
The bioactive enclosure that I set up over the course of this summer was made for Mary Kay, the Cayuga Nature Center’s resident crested gecko. Bioactive enclosures work well for most species of reptiles, so setting one up for another species should be a similar process as long as the proper research is done to make sure that none of the plants, fungi, or substrate materials used could be harmful to the animal. The enclosure I set up was a long-term project that I worked on as part of my job last summer at the Nature Center, and it took me about two months from start to finish. However, if you want to make a bioactive enclosure of your own it may be a quicker process because I worked on it in small increments each week.
What Does Bioactive Mean?
A bioactive enclosure is set up to include living elements that work together almost like a miniature ecosystem within a tank. Live plants, fungi, and microfauna are all key inhabitants in a bioactive enclosure. Microfauna, like the springtails and isopods I used in Mary Kay’s enclosure, help clean up waste and serve as occasional food sources. The fungi also help clean up waste by aiding in decomposition and turning the waste into nutrients. In turn, the plants use these nutrients to grow so they can provide shelter and humidity to the animal inhabitants of the enclosure.
One of the main benefits of bioactive enclosures is how low maintenance they are once they have been fully set up. The enclosure only has to be fully cleaned about once every five years! There is very little daily upkeep, and it just includes cleaning droppings off the glass, misting the tank, and checking the temperature. The living elements of the tank require a bit more maintenance, such as trimming plants if they grow too big and aerating the substrate with a fork every couple of months to give the microfauna more room to travel. Bioactive enclosures also benefit the animals living in them by providing a more natural and lifelike environment to keep comfortable in, and they can be customized to fit the animal by choosing native plants and fungi.
While there are many positive aspects to building a bioactive enclosure, setting up the tank incorrectly can cause harm to the animal living in it. Choosing plants and fungi that are non-toxic is important, along with making sure there is proper ventilation and the right kind of lighting. Creating the enclosure can be a lengthy process, but the long term benefits make up for the time spent researching and building.
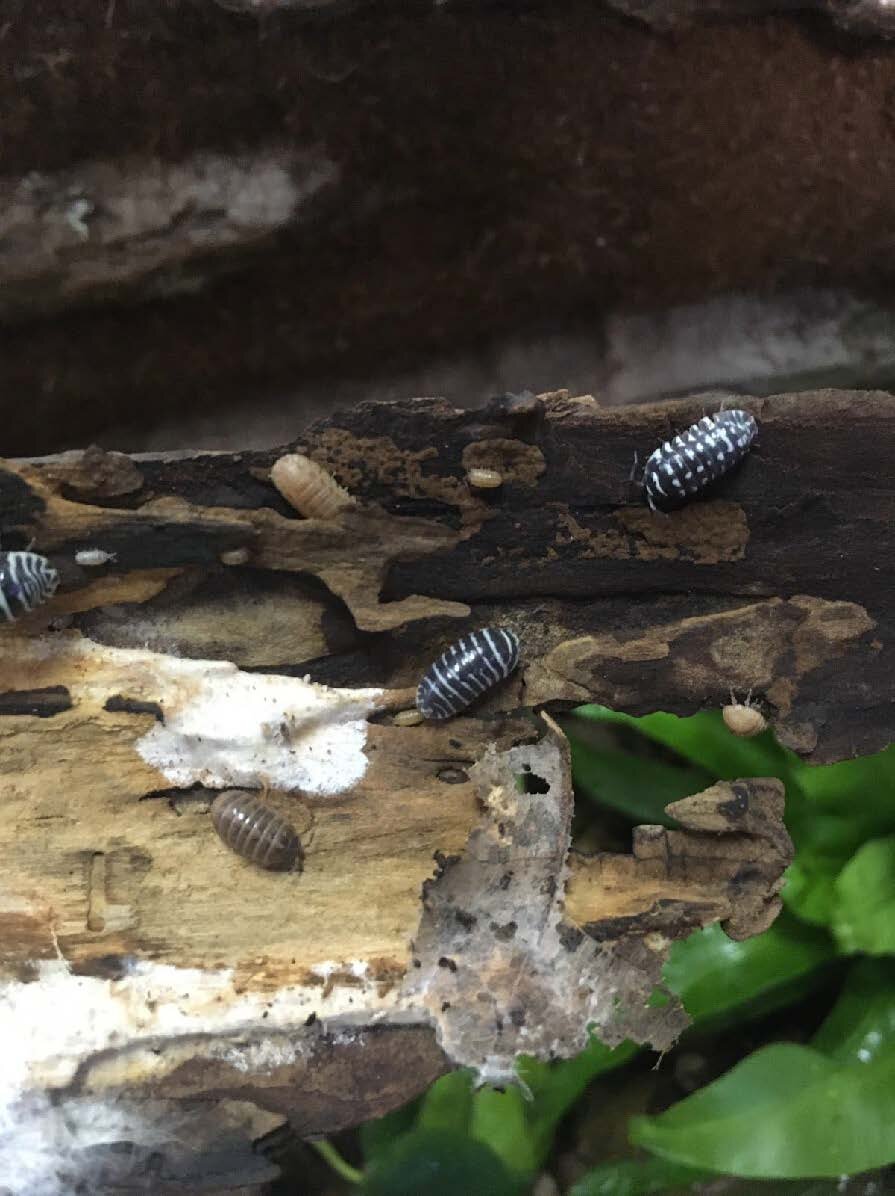
A few of the isopods that went into our bioactive enclosure.
The Process
Step 1: Building the Tank
The tank I used to build Mary Kay’s enclosure in is a 24” x 12” x 16” glass tank with a mesh top. Before I could add any living elements, I had to set up the hardscape for her enclosure, which was made up of dry driftwood pieces attached to the sides of the tank and some coconut fiber to add texture and a more natural look.
The first part of designing the hardscape was picking out the right pieces of driftwood and arranging them. This is really up to personal interpretation of what looks good, but I chose to arrange my driftwood pieces almost like platforms on the sides of the tank so that Mary Kay had lots of interesting places to climb and hang out. I got a big piece of paper and outlined each wall of the tank I wanted to cover (the back and the two sides); once I found an arrangement that I liked, I traced each piece of driftwood to mark its place.
In order to get any unwanted bugs or bacteria out of the driftwood, my supervisor boiled the pieces for about an hour in a large pot of water and I set them out to dry. Then, once they were dry, I got to work on the messy part - using spray foam to adhere the driftwood to the sides of the tank. Like many things in life, this was a process of trial and error. I started by trying to spray foam over the whole back of the tank, but I quickly realized that was a bad method because I couldn’t see the paper underneath the glass where I had outlined the locations of the driftwood pieces. The method that ended up working best for me was spraying foam onto the bottom of each piece of driftwood, then sticking it on the glass and filling in the empty space around all the pieces. If you end up making a bioactive enclosure at home using the same process, be aware that the spray foam is very sticky and it smells pretty bad! Make sure to wear gloves and spray it outside or in a place with good ventilation. The foam canister also gives some safety instructions for using it, so be sure to read those before spraying.

Filling in the tank walls with spray foam.

Filling in the tank walls with spray foam, continued.
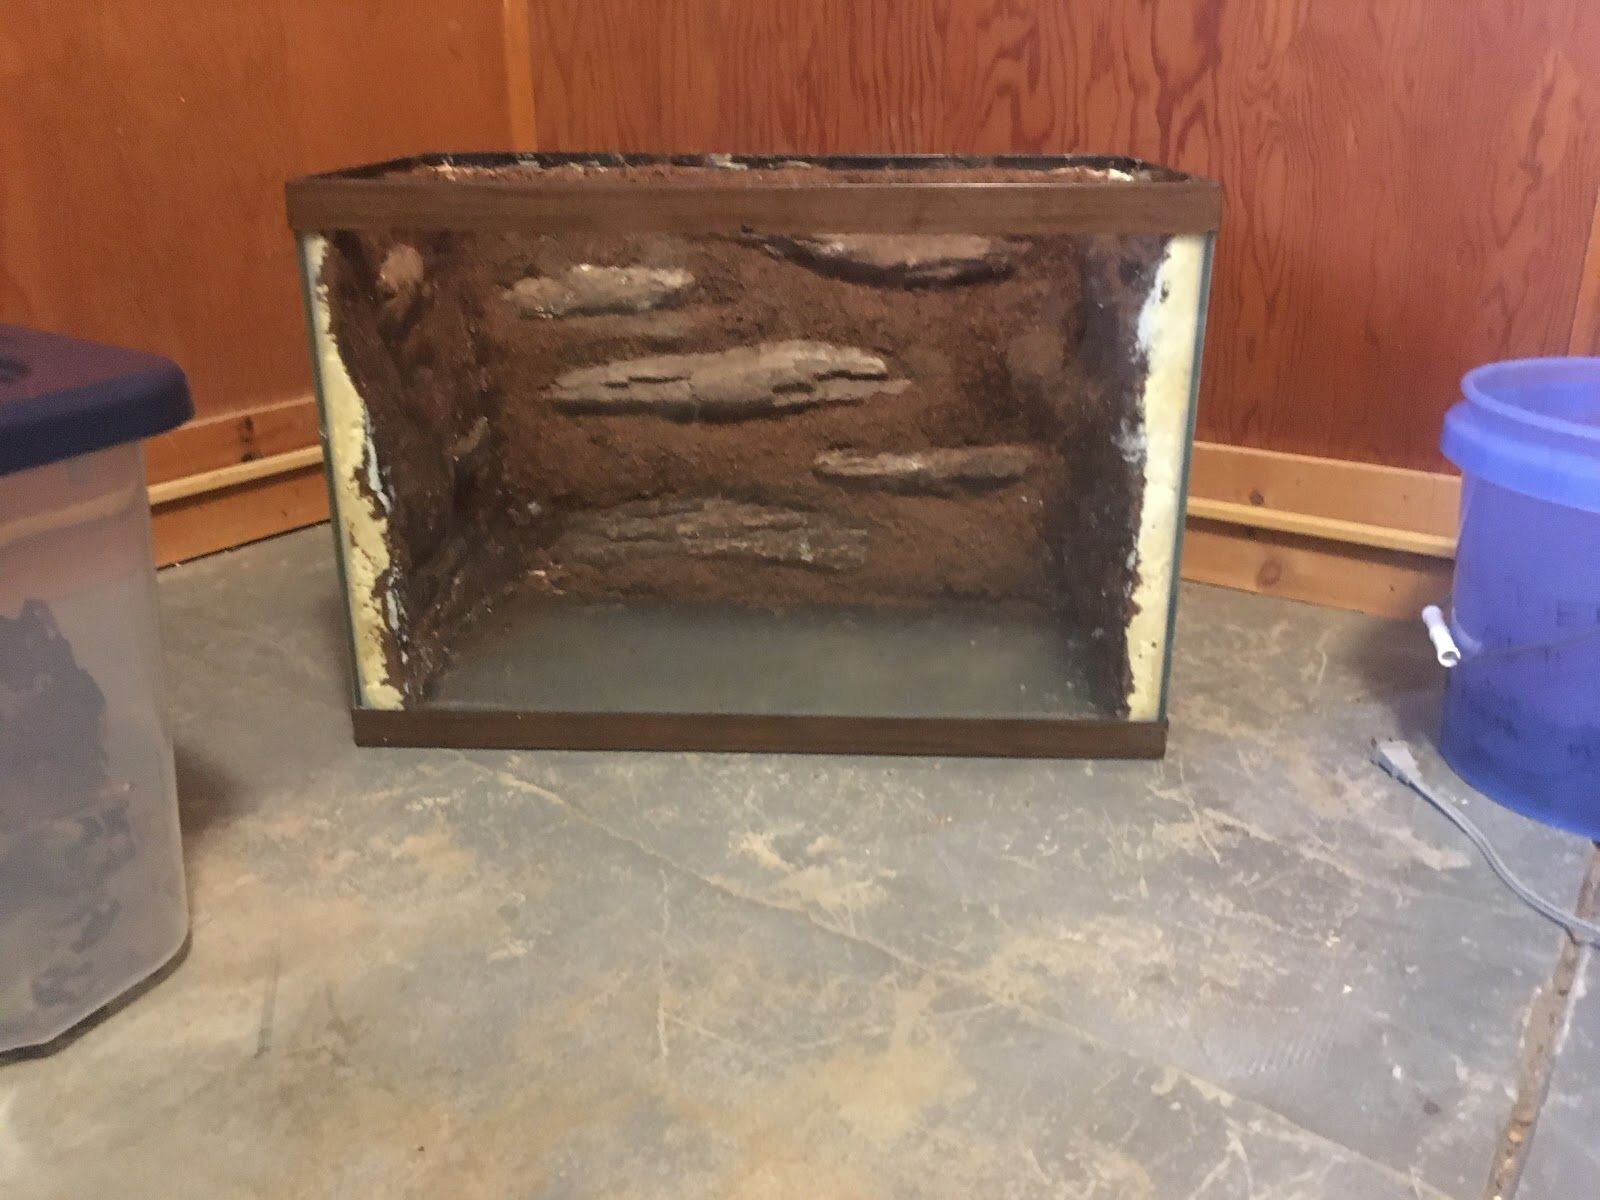
With the foam all filled in, the next step was to shave down all the places where the foam had expanded to even out the appearance and create a surface to adhere the coconut fiber to. I went through a variety of tools before I found what worked best, and I found that a small serrated knife did a good job of carving out the foam easily. The knife I used was part of a clay toolkit, but any serrated knife that is relatively small and sharp will do fine. I used a sawing motion to slowly cut away the shiny surface of the cured foam until the sides were relatively even and flat. It’s not too important for the foam to look perfect, because a bit of lumpiness gives it a more natural look anyway, but cutting away the foam does clear up more space within the tank.

The tank after the excess foam has been cut away.
The last step of building the tank was to cover up the foam with a layer of silicone and coconut fiber. This part was messy too, and just like the foam the silicone was sticky and smelled really bad. Even outside or in a well-ventilated room, I could only work on this part for about an hour at a time before the fumes became too much to deal with. I decided to go about this part by squeezing the silicone onto the cured foam and spreading it with a butter knife around a small area, then placing a heaping handful of coconut fiber over the silicone and pressing it in. Each time I went back to work some more on the tank, I would wipe away the loose, dry coconut fiber with a large paintbrush and fill in any areas that didn’t get completely covered. This was probably the longest and most tedious part of the whole process, because I had to go back and fill in the patchy areas so many times. I found that of the two kinds of silicone I used—white and clear—the clear silicone gave a much more even coverage and natural-looking appearance. I had to do more layers using the white silicone because it would show through if it didn’t get completely covered by the coconut fiber.
The finished hardscape.
Step 2: Making it Bioactive
This is where the enclosure comes to life! Once the tank’s hardscape was all finished, I worked with my supervisor to fill the tank with substrate and add the living elements. The first step was to place down a layer of HydroBalls (small balls of clay that help with drainage) on the bottom of the tank. We soaked the HydroBalls with water from another animal’s tank filter to add beneficial bacteria and microorganisms. I then cut out a sheet of mesh to fit the dimensions of the tank, and set it on top of the Hydroballs to separate them from the substrate.
The substrate we made was an approximated mixture of:
Coconut fiber
Sand
Composted manure
Lump charcoal
Sphagnum moss
Crumbled oak leaves.
The mix was mostly composed of coconut fiber and composted manure, with a few handfuls of the other ingredients added. When it was fully mixed, I poured it into the bottom of the tank.
The three plants we chose to add to Mary Kay’s tank were pothos, bird’s nest fern, and a small spider plant. These came from a plant nursery, so their roots and leaves were thoroughly washed to make sure no pesticides got into the enclosure. Once they were planted, the substrate got topped off with a few whole oak leaves and some small driftwood pieces, and the isopod and springtail colonies that had been living and growing in their own containers for the summer were finally added to the bioactive enclosure. Believe it or not, isopods are actually crustaceans even though they live on land and look like bugs. If you’re familiar with prehistoric trilobites, you may have noticed a resemblance between the two. That isn’t a coincidence! Trilobites are one of the earliest known groups of the phylum Arthropoda, which isopods belong to. Another fun fact - isopods are also very cute!

Armadillidium maculatum, Zebra Isopods.
Step 3: And Now We Wait!
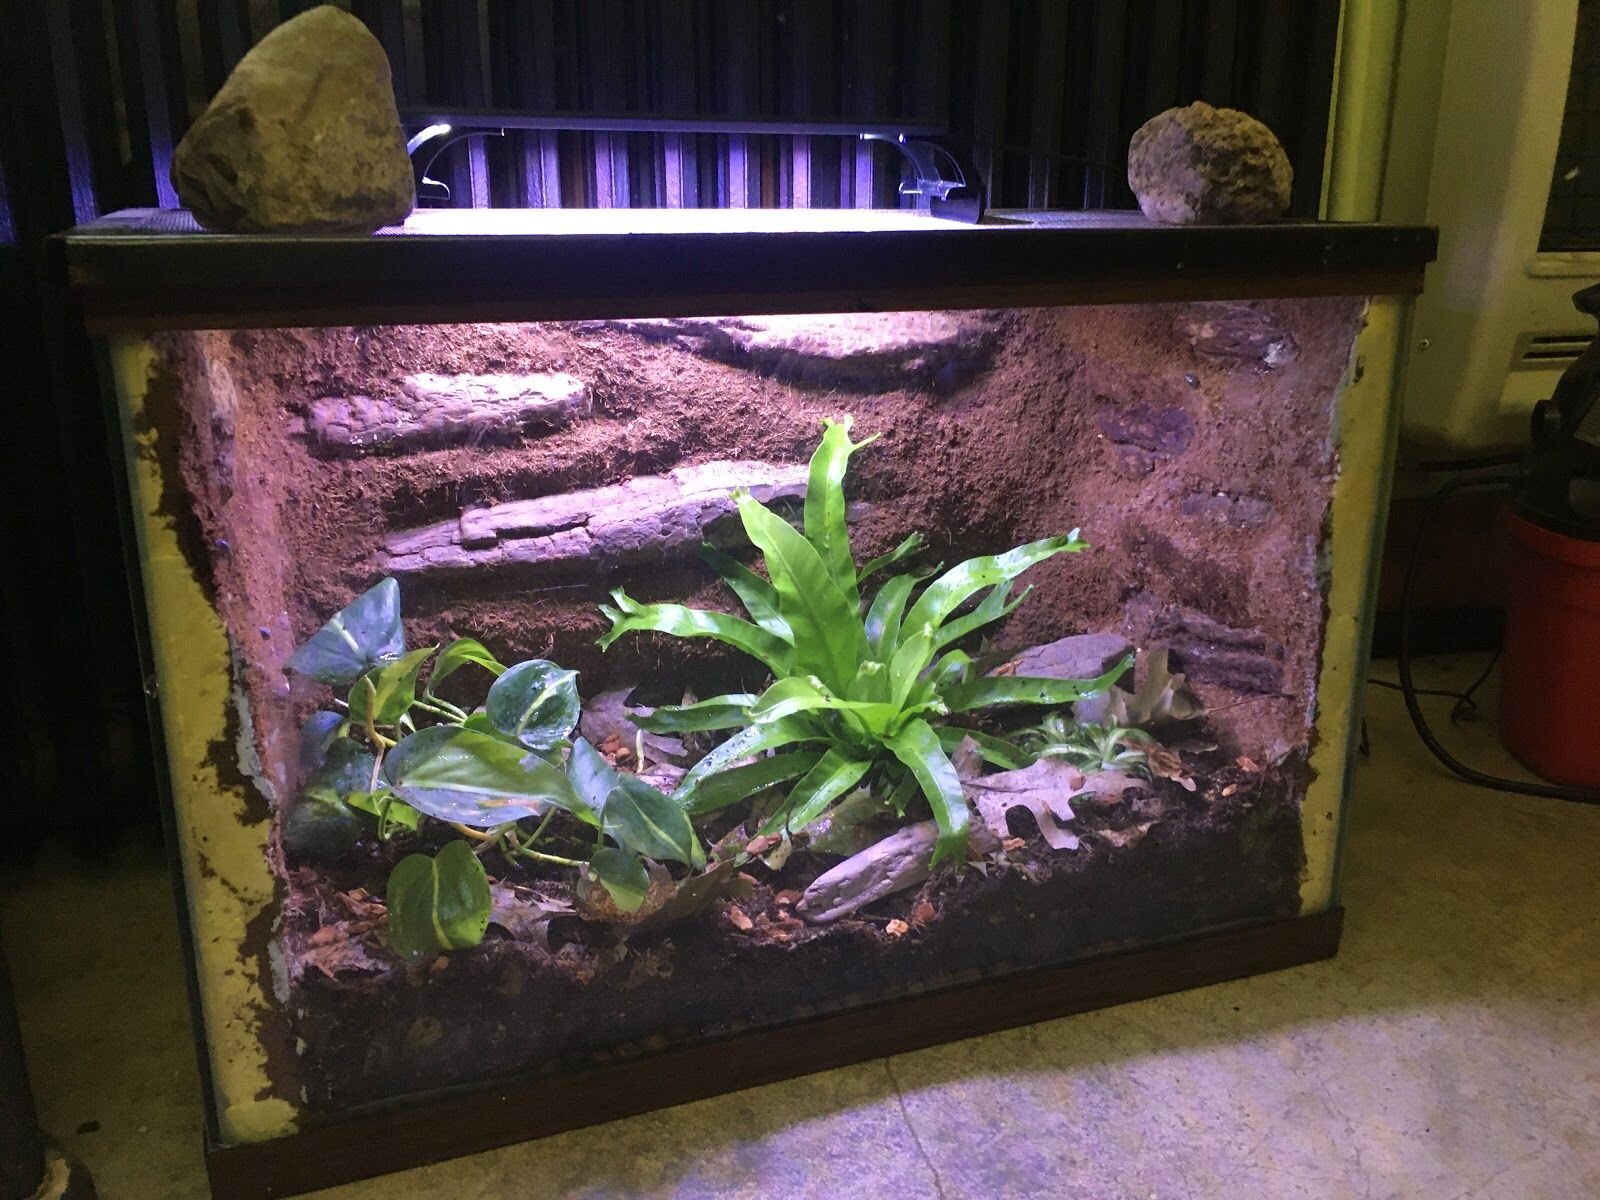
The fully completed tank.
Now that the tank is fully set up, it will take about a month for all of the living elements to settle in before Mary Kay can be introduced to her new enclosure. Hopefully during this time, the plants will take root and start to grow, the microfauna will establish a home, and the initial fungal bloom will subside. While the tank sits, it still needs to be misted, and ideally the temperature and light level should be checked to keep the living inhabitants healthy. If any of them seem to be struggling, the tank upkeep can be adjusted to help them flourish. It may also need to be cleaned occasionally just to get rid of any dust or dirt that settles. If all goes well, the tank should be ready for Mary Kay soon.
Final Thoughts
The process of setting up the bioactive enclosure ended up taking longer than I had expected, but the goal of creating such a low-maintenance and animal-friendly habitat made it well worth it! It took careful research from start to end, a process that took time but was very satisfying because of everything I learned. I spent the majority of my time on this project setting up the hardscape. Although the bioactive elements were the most important part, they only took a few hours to fill in. Anyone who plans to set up a bioactive enclosure of their own should be aware of the time commitment and effort it takes to make one, but it’s completely doable as long as you do the research. It also has the potential to be a really rewarding project, for both you and the animal whose home you are creating!
Update: Mary Kay is now in the bioactive enclosure and is doing great! The vine did not flourish and needed to be replaced, but that is the only significant change that has been made.

Mary Kay.

Author Rose Zabel and the finished bioactive enclosure.

Mary Kay.